After warming up with the Welsh 3000s and Mont Blanc over the summer (and continuing with my regular 5-6 times a week training schedule after that), I felt ready to tackle Aconcagua which had been on my list for a couple of years. It was not the easiest of decisions as I’d never been higher than Kilimanjaro with its 5,895m and that 1,000m+ elevation gain on top of what was already a high peak seemed daunting. What’s more, an annoying knee injury in September also had me worried I wouldn’t recover before December, but there’s never a perfect time so I booked my tickets.
To make things more interesting (or worse, depending on who you’d ask), I decided to climb it solo — no guides, no porters, no cooks, just me and my (heavy) backpack. Some of my friends said it was reckless, but I knew this was the perfect opportunity to try to be on my own at high altitude. I had been on a few guided climbs, gaining enough experience to know what to do in different situations, and had also accumulated a decent set of gear. Plus, I’d researched the mountain quite well (including speaking to a couple of people who had summited) and knew it wasn’t technically challenging on the northern route and the chance of mixing up the path was really small. These things add up and help you feel mentally prepared.
A few fun facts about Aconcagua — with its 6,962m (22,837 ft) it’s the highest peak in South America (Southern and Western Hemispheres, actually) and also the highest outside the Himalaya / Asia. It is the second most prominent mountain in the world and second highest of the Seven Summits after Everest. It’s located entirely in Argentina, though close to the border with Chile. There are a couple of routes up the mountain, with the easiest being the normal one from the north which I took as well. It’s not a technical climb at all and the biggest challenges are the wind, cold (usual temperatures at the top are around -20/30°C), and altitude. Due to the former, many people underestimate it which is why every year there are multiple deaths on the mountain. Around 3,500 people try to summit each year with a success rate of about 60%.
For me personally this was by far the most difficult climb I’ve attempted. I was the under the impression I was fairly well prepared physically, but the 16-hour summit day was gruelling despite the fact that we were really, really lucky with the conditions. Can’t imagine what it would have been like in worse conditions. I almost quit a couple of times and genuinely thought I might pass out at one point just below the summit. Not sure if this was because I wasn’t well acclimatized (I reached the top on day 8 as there was an opening of good weather that was worth going for whereas most groups try after day 11 or 12 I believe) or because what I imagined was a good fitness level is no where near what I need for those altitudes. If it’s the latter, then I’m in deep doo-doo 🙂 Regardless, I gained even more respect for the guys climbing the 8,000m+ super technical peaks in the Himalaya, they must be insanely fit.
Here’s a useful map of the normal route with the camps.
– Confluencia (3,300m)
– Plaza De Mulas (4,300m) — Base camp
– Plaza Canadá, high altitude camp 1 (5,050m) — not shown below
– Nido de Cóndores, high altitude camp 2 (5,520m)
– Berlin / Cólera, high altitude camp 3 (5,930m / 5,970m)

I’ve broken down the post into days to make it easier to follow. For the sake of brevity (I use the term loosely, the post will be long) I haven’t included any info on my equipment, but there are plenty of videos online like this one, assume I’ve taken all of this.
*****
Day 1, December 17th: Horcones to Confluencia (3,300m), 2-3 hours
After getting final supplies in Mendoza (gas, some food, etc.), I got on a bus that drops you off at Los Penitentes, pictured below. It’s a super small town that people normally sleep in for a night as part of their acclimatization and arrange how their bags would be transported to the camps. I paid for a mule to take my duffel bag with the high altitude gear directly to Plaza de Mulas (Base camp), but decided not to stay the night as I felt ready to go directly to the first camp, Confluencia. The company I used for the mule also arranged a car to drop me off at Horcones, the Aconcagua park entrance which is ~2,700m above sea level, a further 10km away from Los Penitentes.

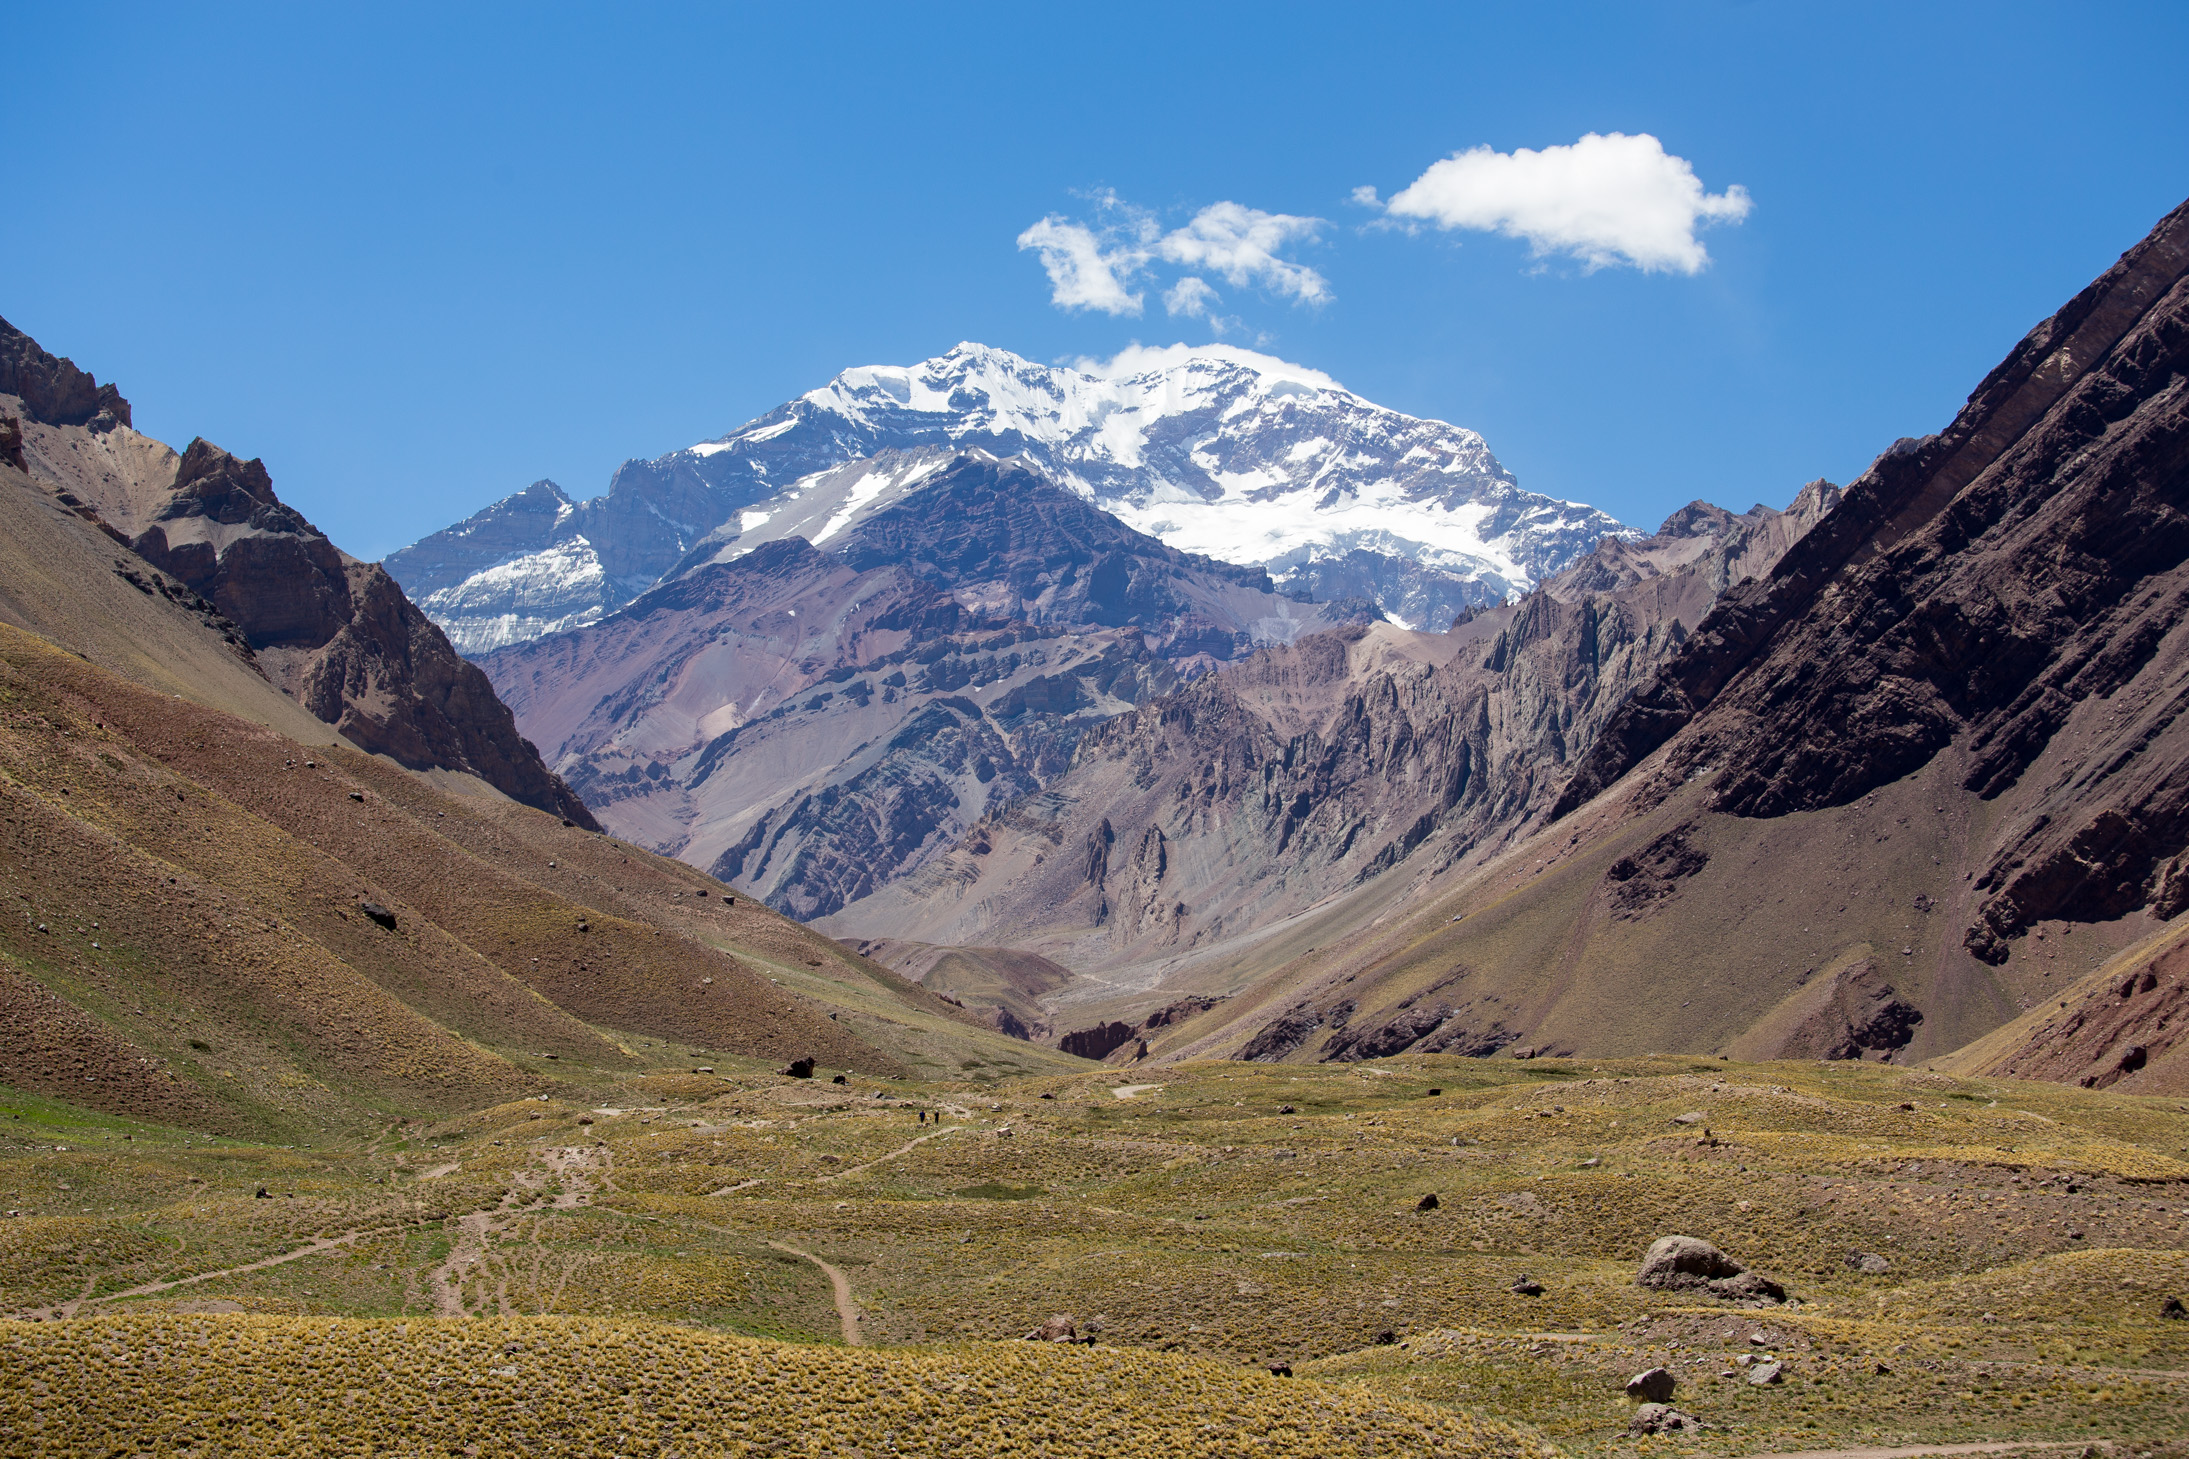
After registering with the park rangers, I was on my way. Within 10 min of walking you get your first full view of the goal — Aconcagua and its majestic South Face in all its glory. Quite beautiful and a bit scary to see the scale. Thankfully I would be climbing from the north, a much less steep face. The weather was on my side, it stayed like this throughout the entire trip.
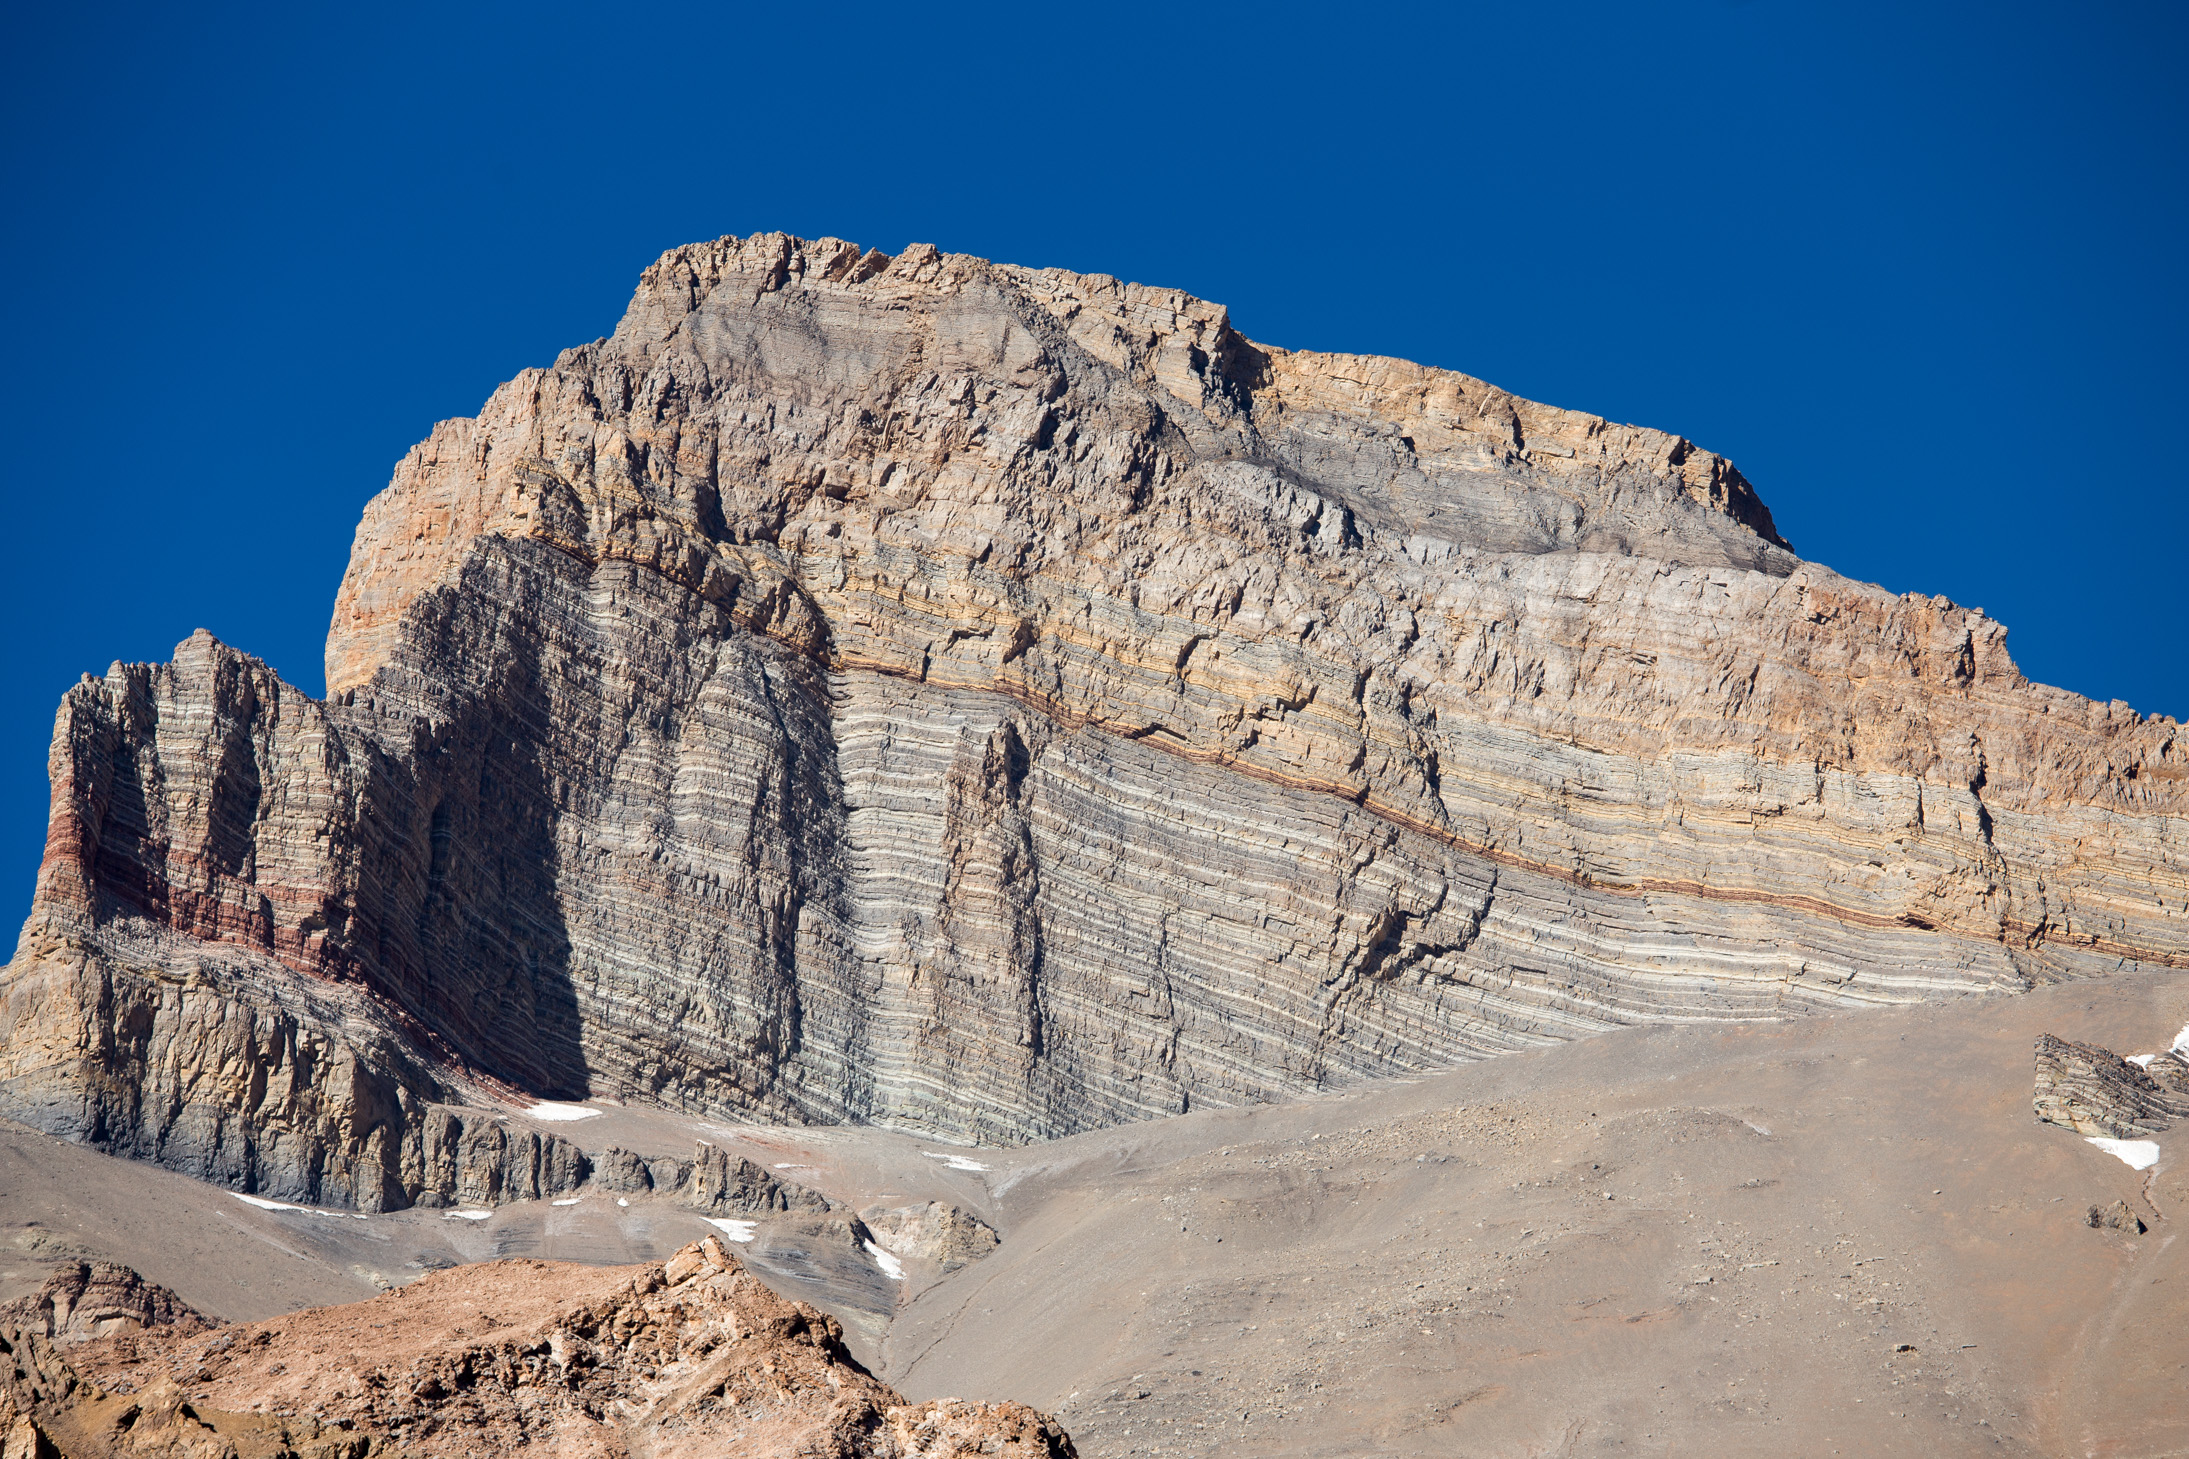
An hour or so into the trek, you’ve already gained a bit of altitude and start seeing more of the landscape. Typical rocky vistas for the Andes.

The first camp, Confluencia, sitting at 3,300m. Notice the lack of vegetation. You’re supposed to check in with the park guard service at every major camp. Also, the doctors at this camp as well as Plaza de Mulas give you a check up (oxygen saturation, pulse, blood pressure, breathing, etc.) and don’t let you go higher unless you’re in a good shape.

Layers. So cool.
Day 2, December 18th: Confluencia to Plaza de Mulas (4,300m), 6-8 hours
The second day is the second longest trek on the way up in terms of distance, almost 20km, with a 1,000m elevation gain. Nothing too steep, for the most part you walk up the valley you see below so a very gradual incline. Quite incredible though, I was mostly entirely alone the whole day amidst these grandiose peaks around me.

Looking back at Confluencia, somewhere around 8am.

The infamous mules — best way to carry equipment up and down the valley. I’m not sure if you can tell how dusty it is, a recurring theme around Aconcagua. The damn dust gets in everywhere, you’re almost constantly dirty.

After 4-5 hours of largely monotonous walking, you finally reach the last climb before Base camp which is located at the foot of that peak you see in the distance (Cerro Cuerno). Just another 300-400m of vertical ascent.

Base camp! 20km with an 18kg backpack in the sun was not the most pleasant of treks so I was quite glad to arrive in just over 6 hours. The tents you see here are for eating / chilling, you sleep in smaller ones.

Life in a tent is not what I would call orderly 🙂 But you get used to it and in fact I found it fairly cosy, everything you need is within reach.

Day 3, December 19th: Rest day around Base camp with a short climb (up to ~4,600m)
Day three was about getting used to the altitude and generally doing nothing outside of eating, reading, and sleeping. But the temperatures were so nice that I couldn’t help do a small trek up to aid my acclimatization. Below me is Plaza de Mulas (Base camp) and on the right you see Cerro Cuerno with its 5,462m. The wide angle lens distorts the image a little bit, but it’s actually a very steep peak with a couple of glaciers coming down it.

Glaciers. Just as a reference, this ice wall is probably 60-80m high…

What else to do around camp on a rest day? Why slacklining with nothing but jagged rocks underneath, of course! 😀

The end of day three also saw the most beautiful sunset on the mountain. This is Aconcagua from the West. It seems so close! Just some measly 2,600m to the top 😉

Day 4, December 20th: Equipment carry to camp 2 (Nido de Cóndores, 5,520m) and back to Base camp, 6-7 hours
It was important to start moving my heavy gear to the higher camps such as tent, some food & gas, warmer clothes, crampons, and so forth. Another 12-14kg backpack and up I went. Photo is taken at the first high camp called Canadá, around 5,000m above sea level, looking up at what lies ahead. That ridge you see seems close, but actually takes a bit of effort, sitting at almost 5,300m. I decided to skip camp 1 for a couple of reasons — for one, the guides at Base camp had already told me December 24th was looking most promising for a summit day (winds below 40-50km/h) and I wouldn’t have had time for a “normal” program with sleeping in all 3 camps; but I also felt quite strong without any altitude problems and preferred to spend time higher up to get me ready.

I’m at the ridge you saw earlier, approximately 5,300m. Down at the bottom is Base camp and on the left is camp Canadá.

Angles.
I don’t really have more photos of that day. I reached Nido around 5 hours after leaving Base camp, dropped off my stuff and tucked it away under some rocks, rested a bit, and then headed back down.
Day 5, December 21st: Rest day at Base camp (4,300m)
I did very little that day so nothing to show. But the first song should have ended by now, here’s another great one.
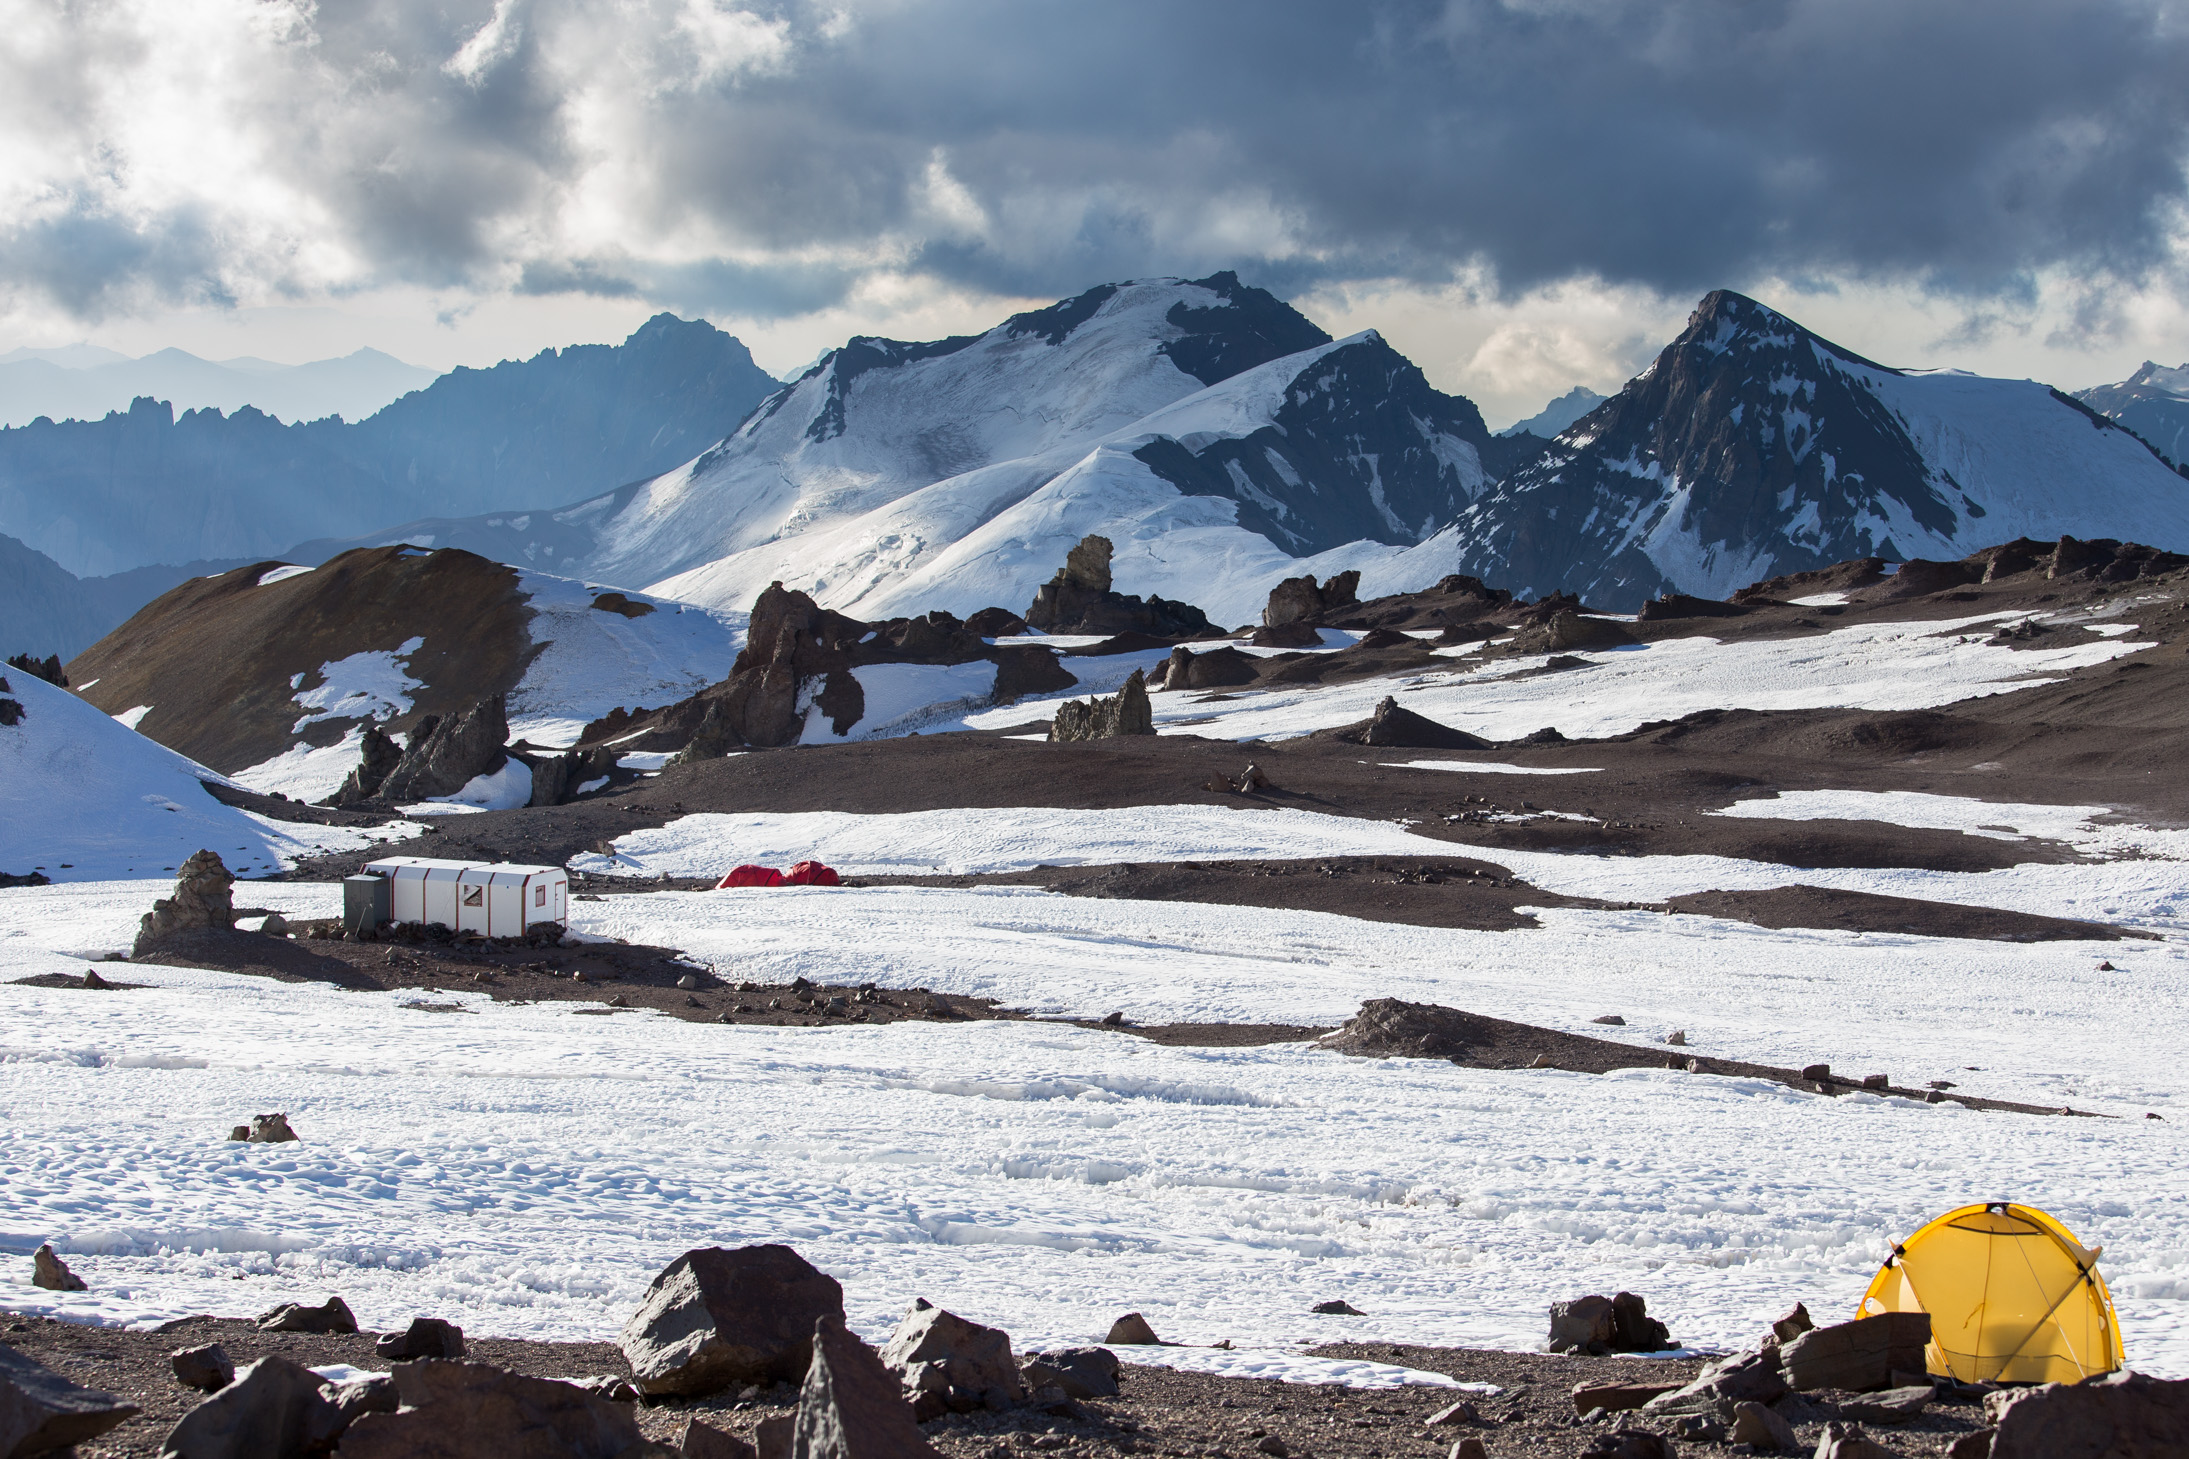
Day 6, December 22nd: Move to camp 2 (Nido de Cóndores, 5,520m), 5-6 hours
Back at Nido and time to put up my tent. Behind it is Aconcagua, though you can’t actually see the top. Not a lot of snow on this northern side. You ascend on the left, beyond the frame of the image and behind most of the rocks you see, until you emerge near the top and traverse on this side.

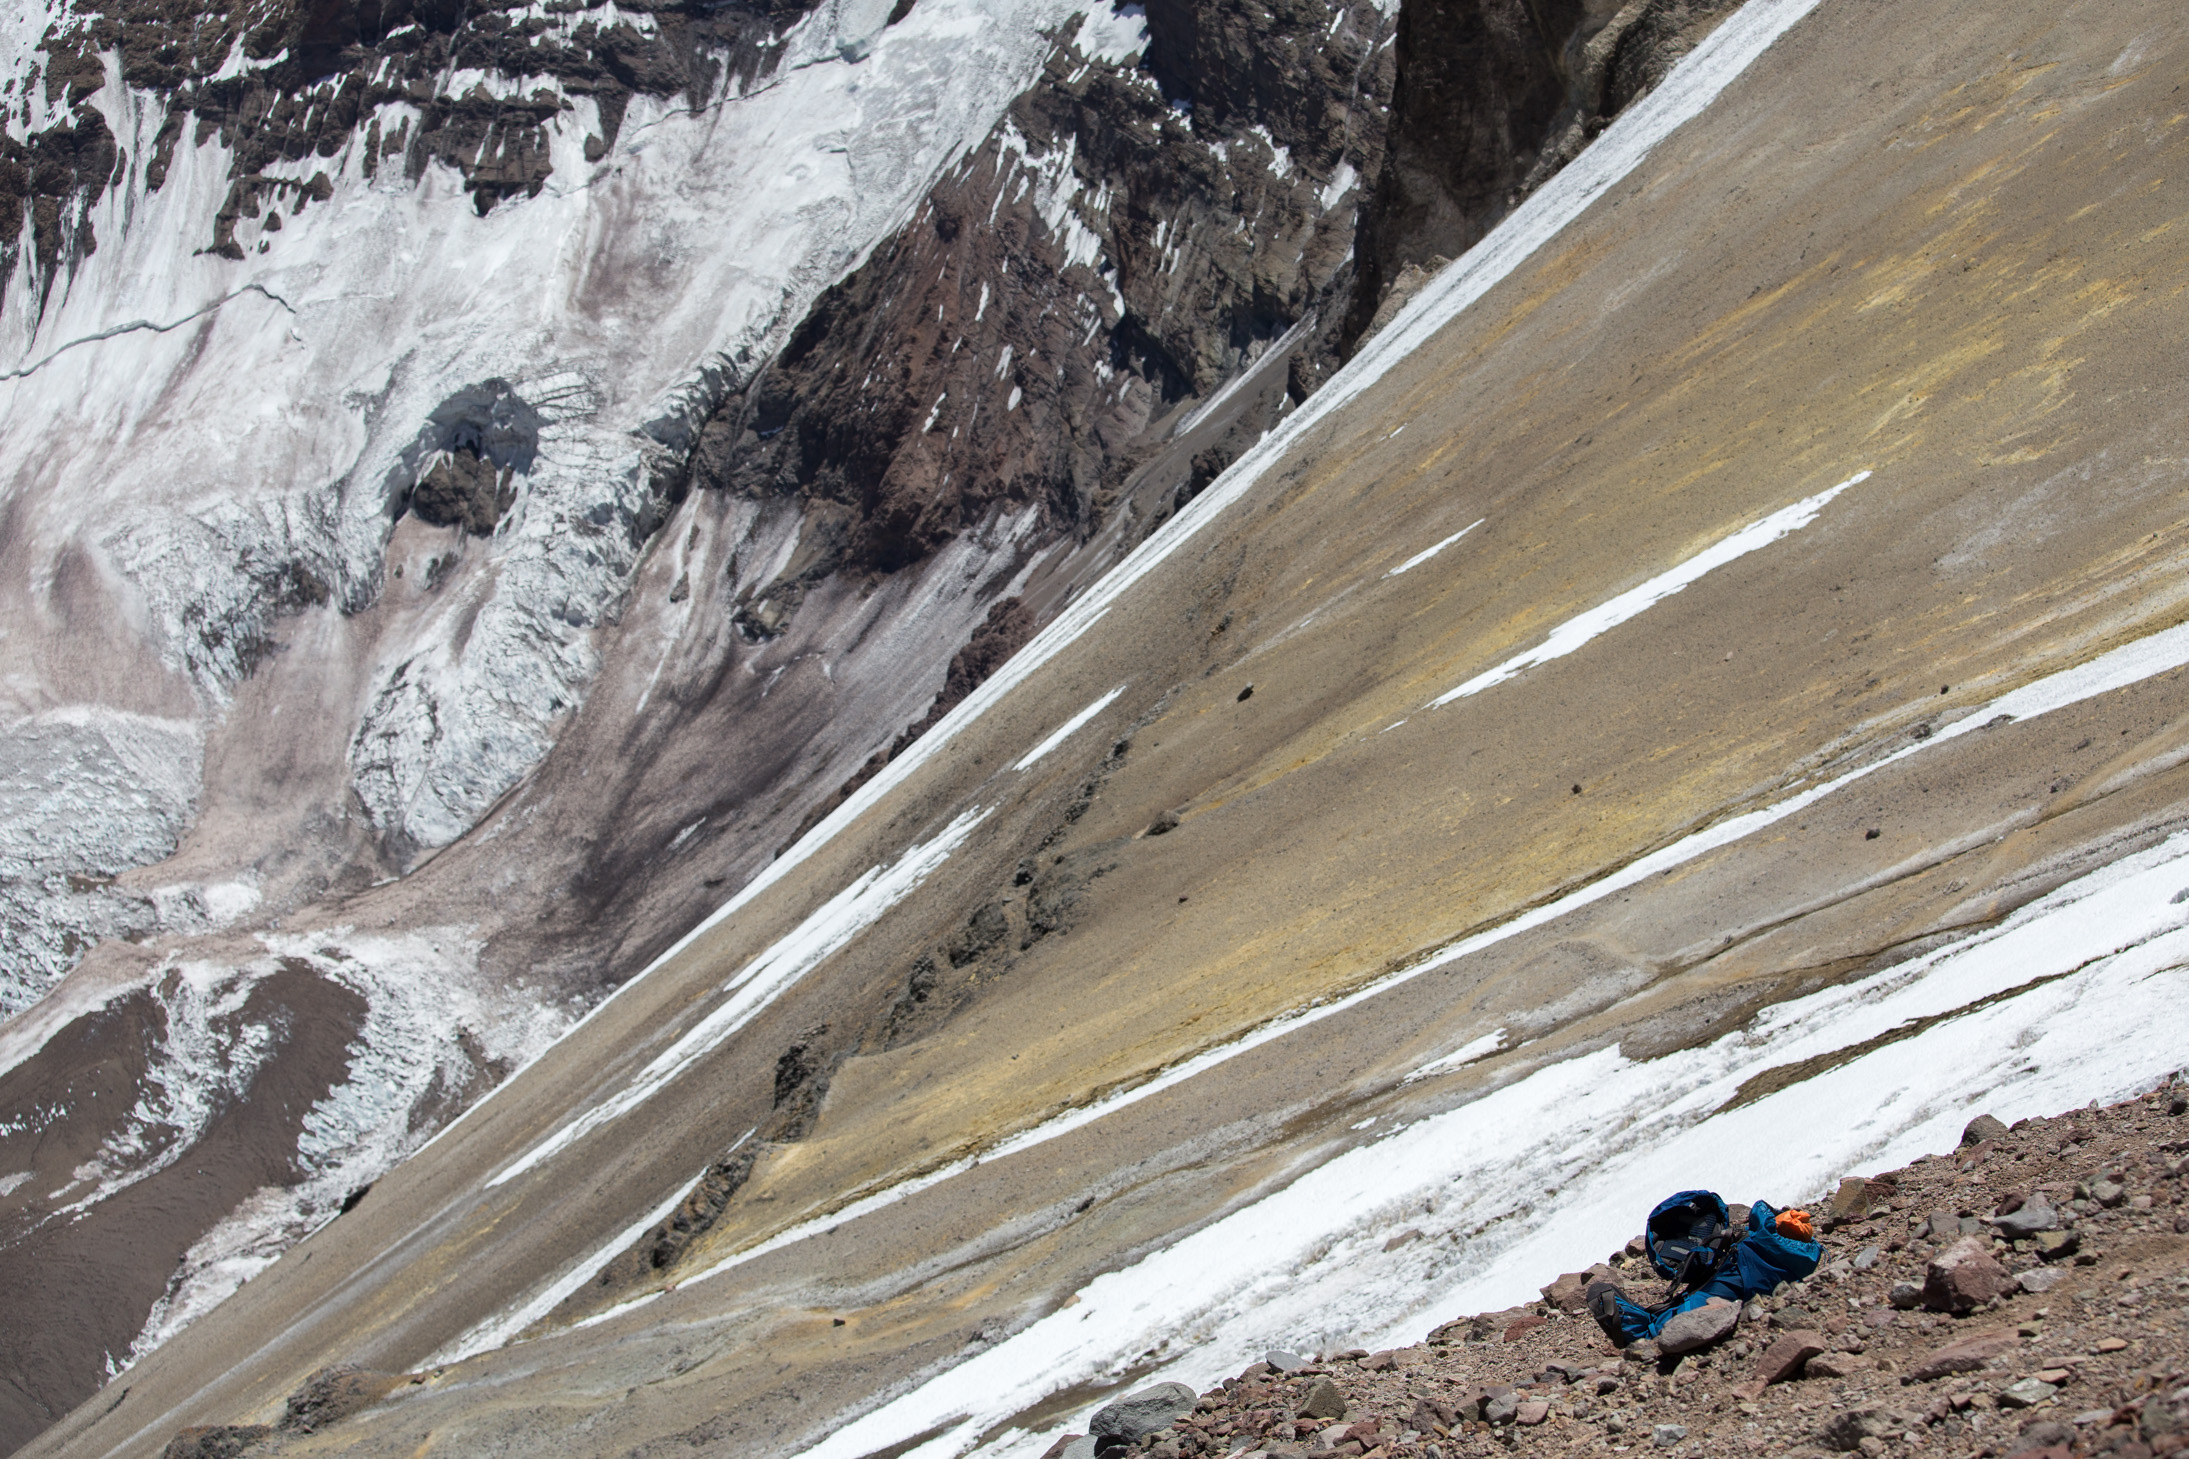
An extreme close up of “almost the top” 🙂 You can now clearly see the traverse that takes you from approximately 6,400m to around 6,650m in around 2-3 hours. Perhaps the scale is a little hard to judge, but a person would be no more than a dot on the traverse path. Crazy.

Views around Nido in late afternoon.
Other people around camp, there were around 10-12 tents in total. Notice how crisp the atmosphere is.

Some breathtaking (and not just because of the lack of oxygen 😉 ) views from camp. That on the right is Cerro Cuerno which we saw earlier, we’re now pretty much level with it.
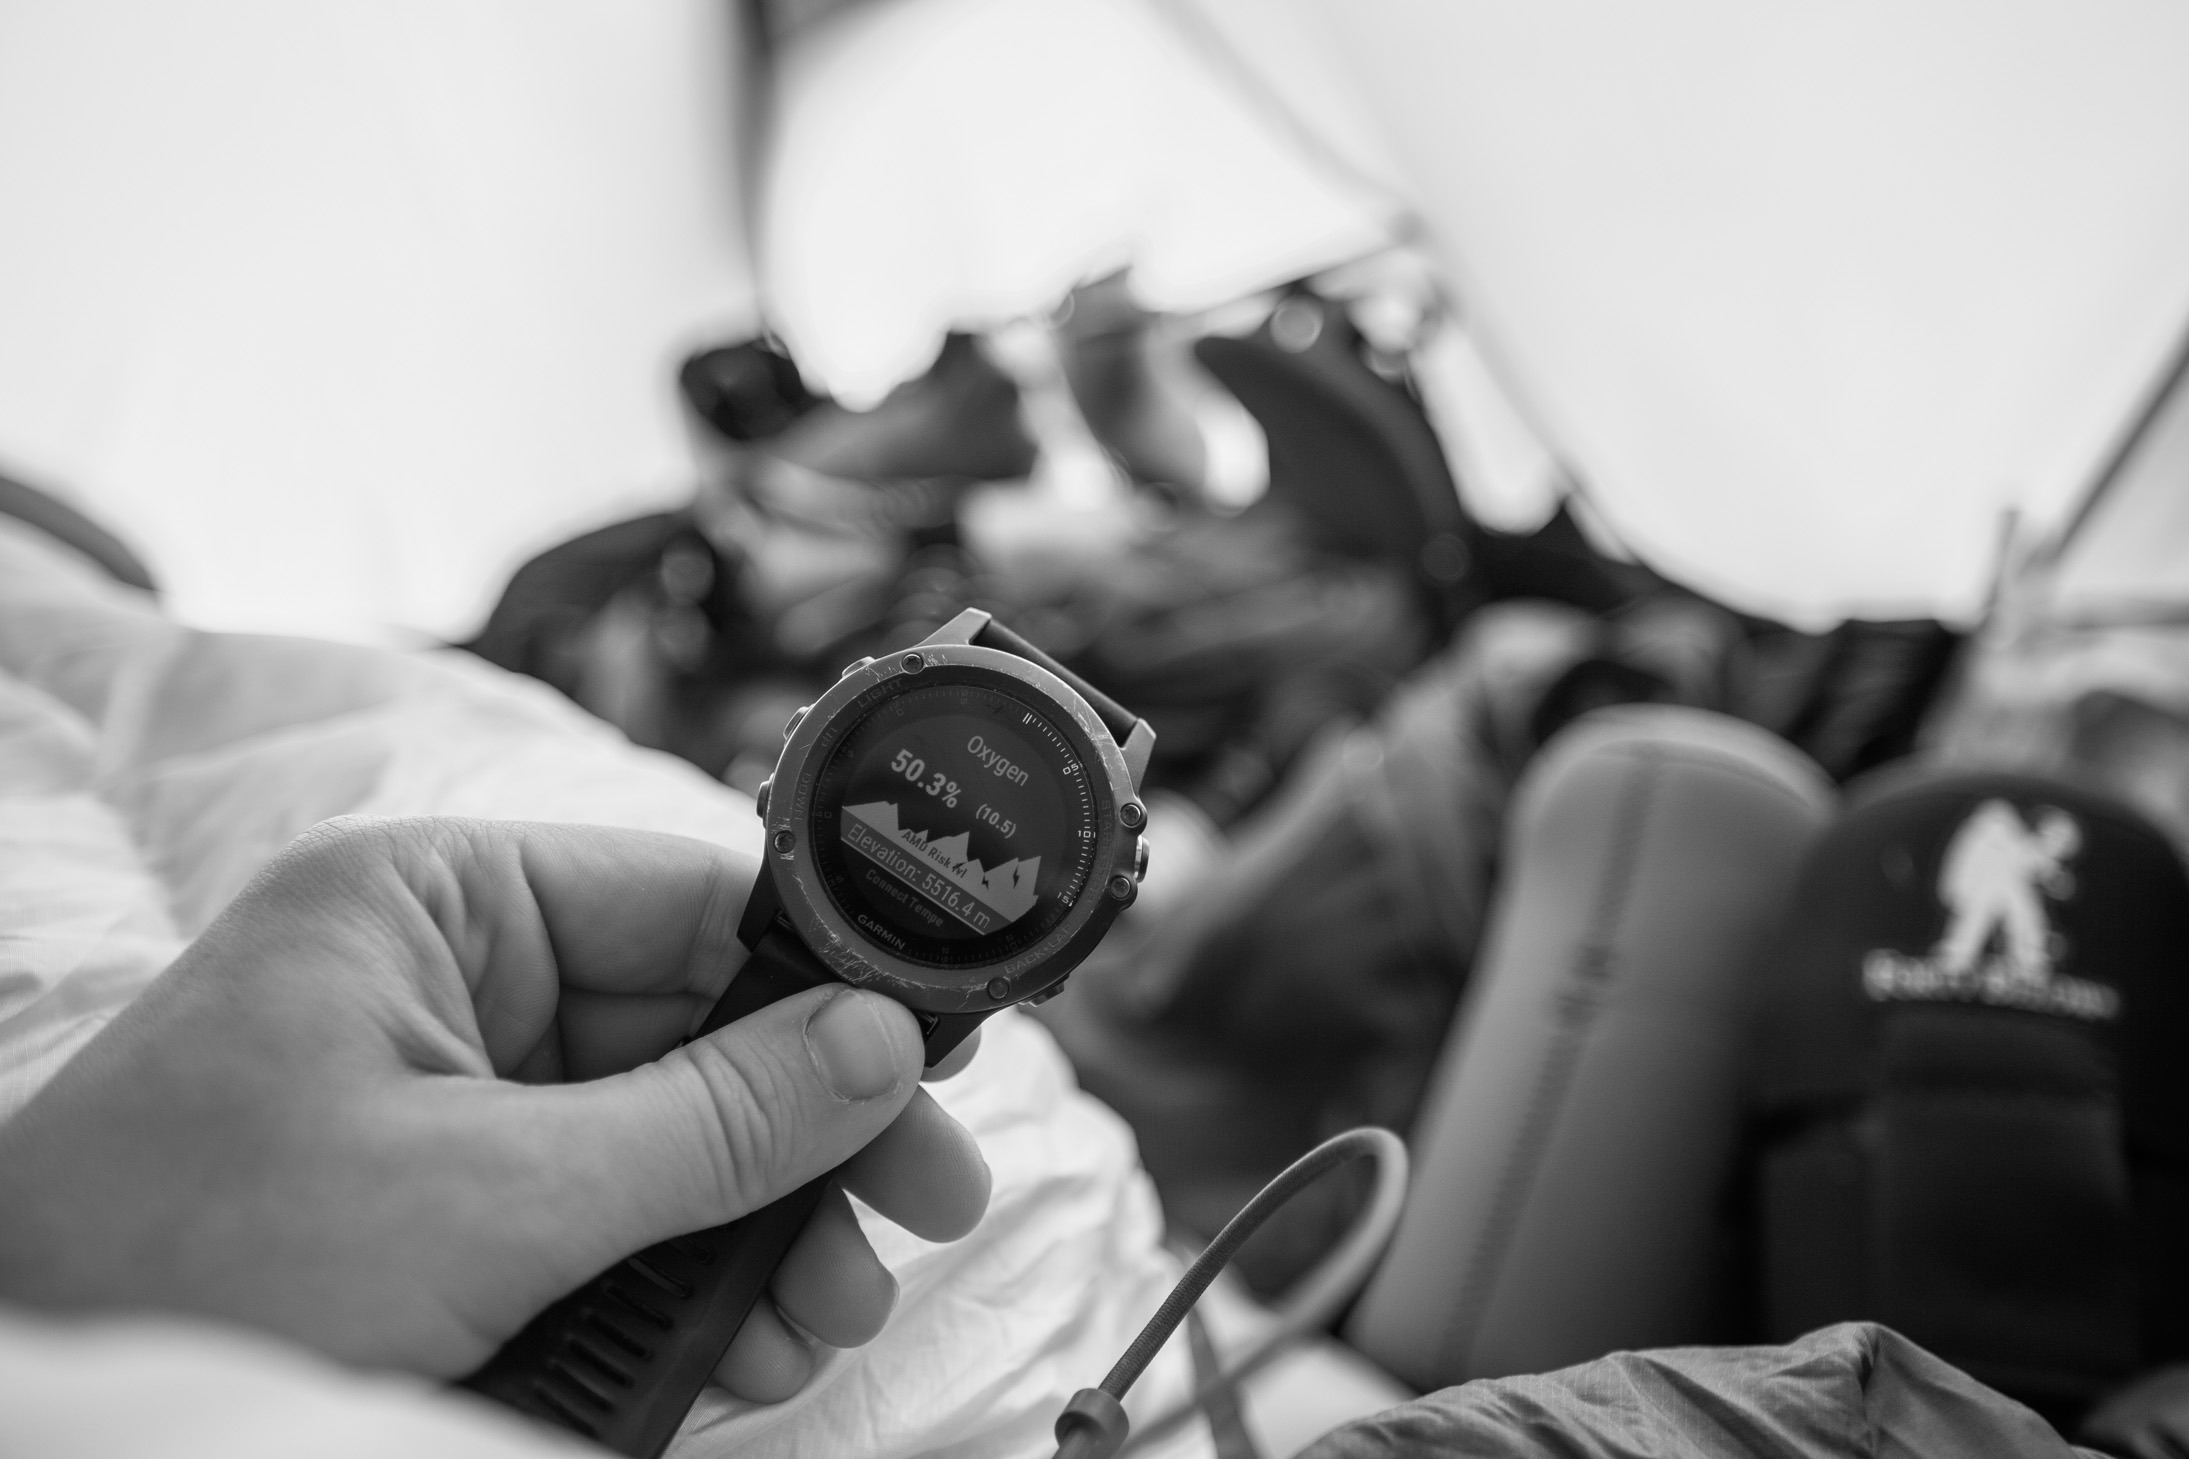
Sleeping at this altitude with 50% of the oxygen at sea level is not easy, especially when there are 50-60km/h winds outside and your tent is shaking and making all kinds of noises. The temperature fell to around -10°C inside the tent that night… Also things take longer than you expect, just getting out of your sleeping bag is a slow process. Time moves differently 🙂
Day 7, December 23rd: Rest day at camp 2 (Nido de Cóndores, 5,520m)
Once again, a slow day for gaining back some strength, eating, and sleeping. This is what my mornings looked like — first melting water for the day, then “cooking” breakfast by pouring boiling water in my freeze dried packet. That MSR stove is incredible, btw, could not recommend it highly enough. It saved me so much time, pure genius.
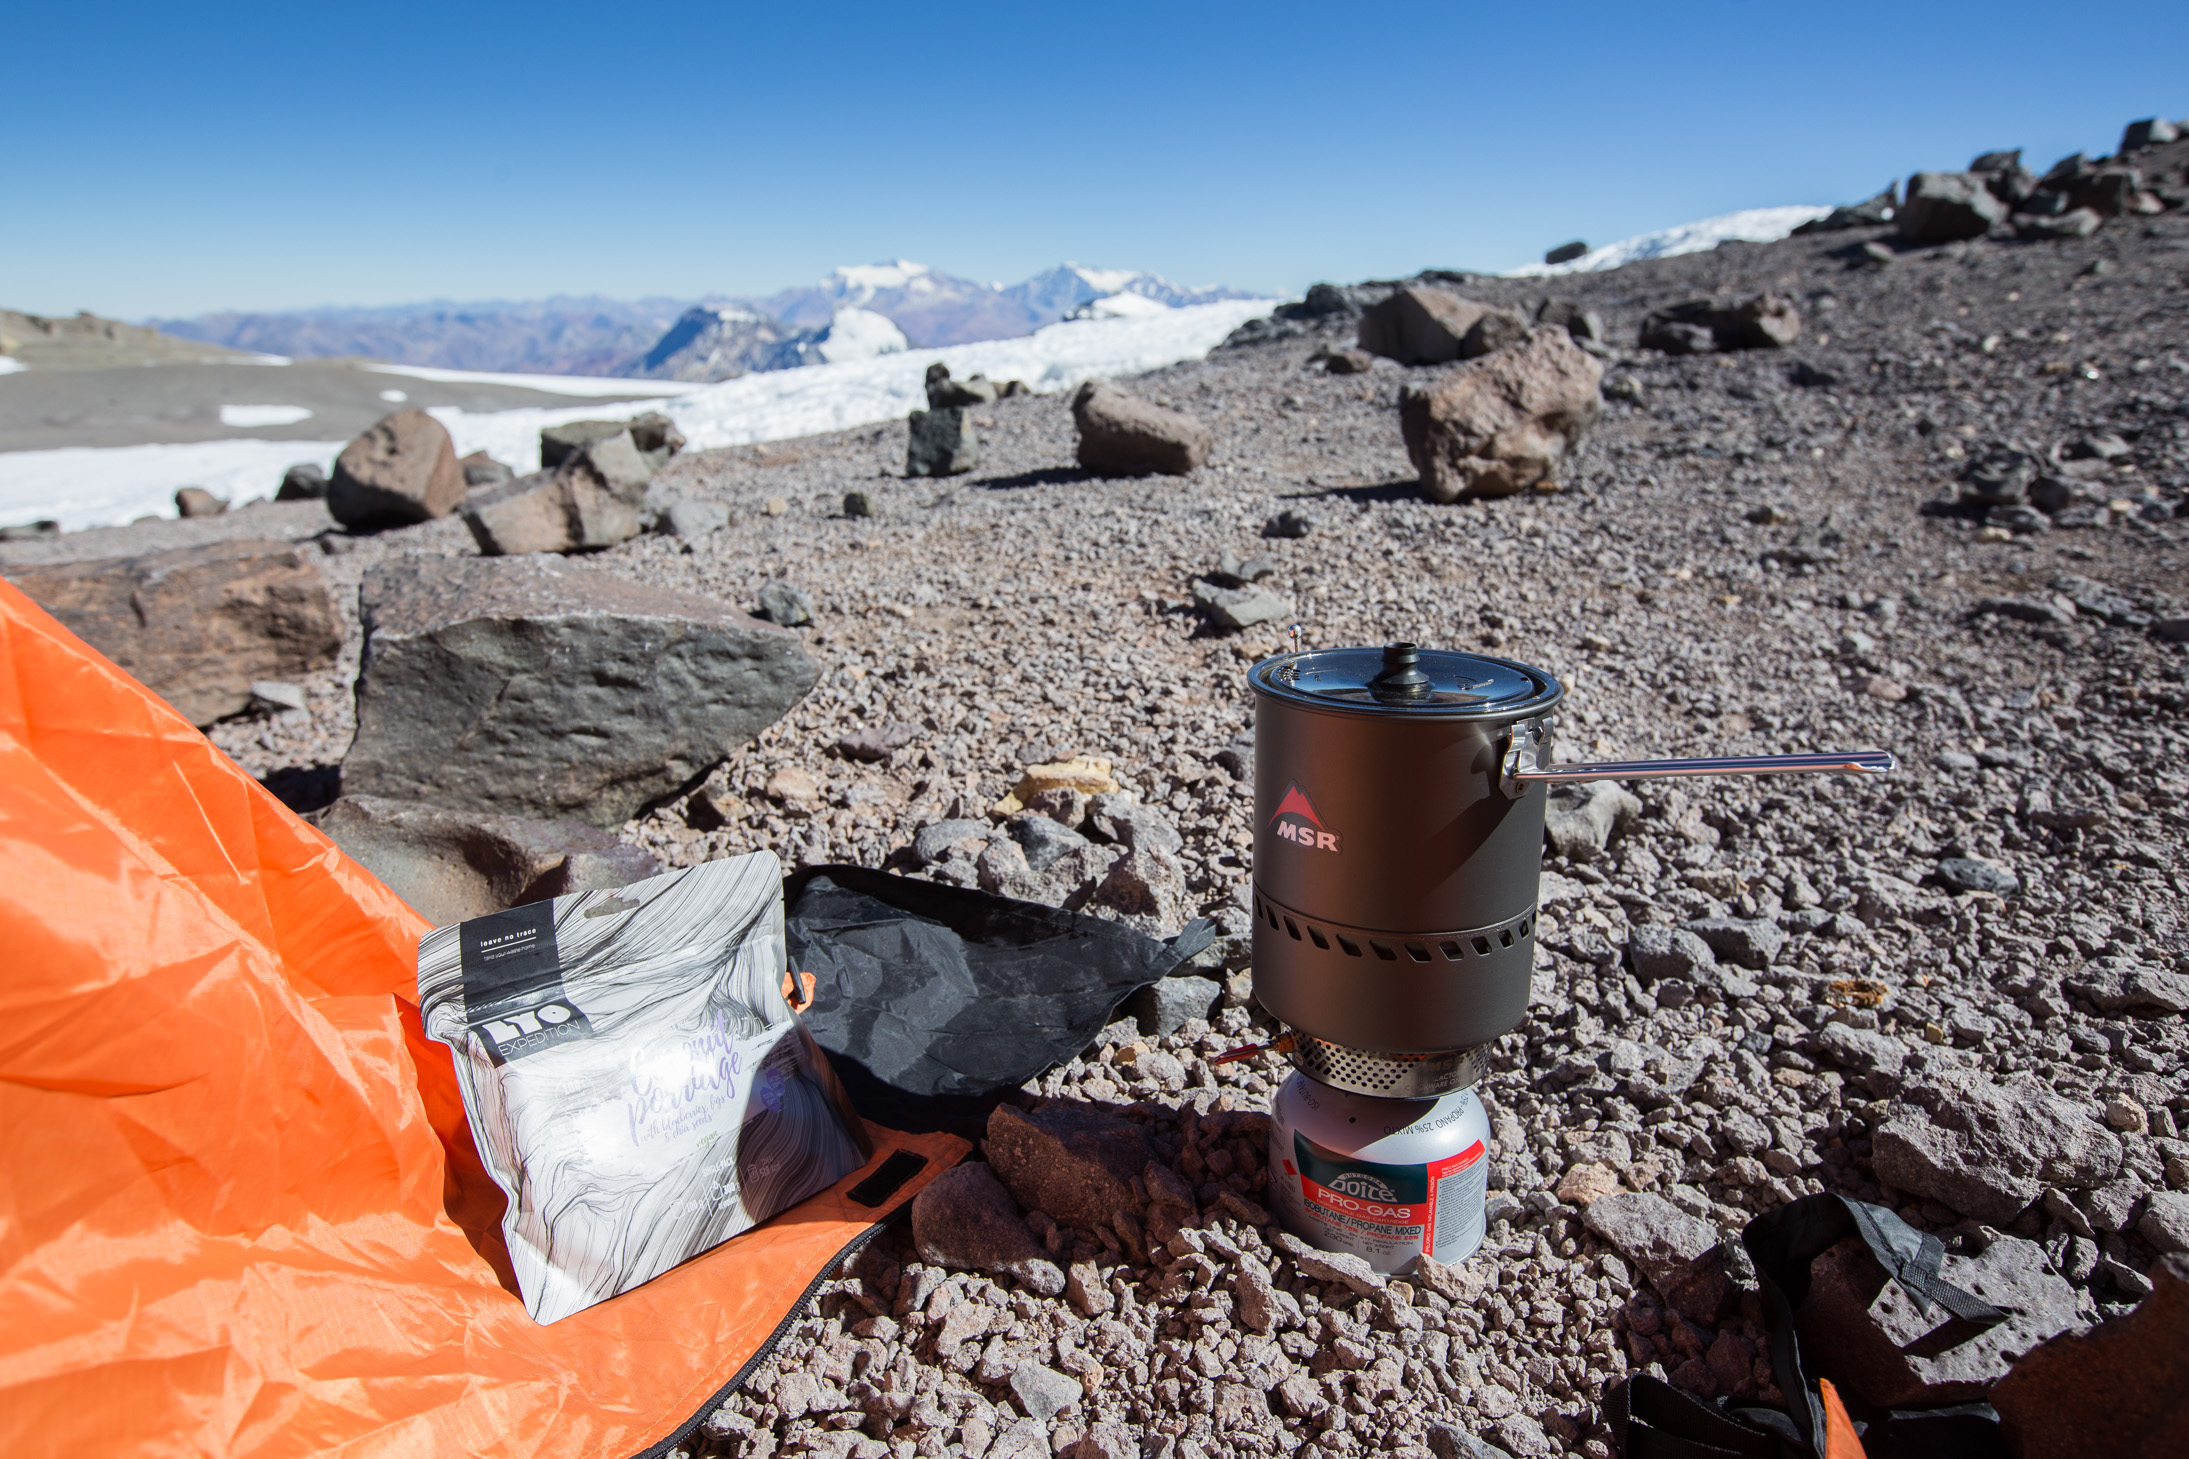
The liquid bottles you need. Two Nalgenes for normal water (which I keep in these neoprene anti-freeze pouches), one thermos (it’s a life saver to have a sip of warm water at the right moment on a tough climb), and one pee bottle (yellow-green-ish cap). Quite important not to mix those up in the middle of the night 🙂

Day 8, December 24th: Summit day! (6,962m)
The long awaited big day was here. As usual for those climbs, you start early (3am in this case) and it’s a process to get ready. Just putting all my equipment and layers on took almost an hour. Trust me, finding the motivation to step out of the sleeping bag and tent at that point is a big hurdle 🙂 As with other night ascents, I didn’t take any photos before dawn in order to keep warm and not break my rhythm.
I had met a couple of other solo climbers (Paul and Aurélien, both from France) the day before and agreed to climb together. We kept a good pace and quickly reached camp 3 (Berlin / Cólera, 5,970m) around 4.30am. The below photo was taken at about 6,100m perhaps, somewhere around 5.30am. What a view of the Andes! You can see a guided group that slightly behind us, they started at camp 3.
At around 6am the long anticipated sunrise was almost upon us. I can’t even describe how good it feels to see the sun, despite this not being the coldest of nights (I was prepared for much worse), it just gives you extra motivation. Love this photo.

Soon after the sun lit up the horizon and surrounding peaks.

Paul and Aurélien ahead of me. The curse of the photographer, to be behind. I need to stop carrying around my big DSLR on climbs like this. It’s heavy and taking shots requires a lot of precious time. Hopefully the results are worth it at least. These guys were better climbers than I was, btw, certainly faster. Sadly Aurélien didn’t reach the top as his equipment wasn’t adequate and his hands and feet were freezing. I gave him hand warmers earlier in the night, which had helped, but when we reached the windy traverse his feet gave in to the temperatures and he turned back. It’s a shame. Despite not having any problems myself until camp 3, by this point I was noticeably slowing down and having some difficulties in keeping with my usual pace.

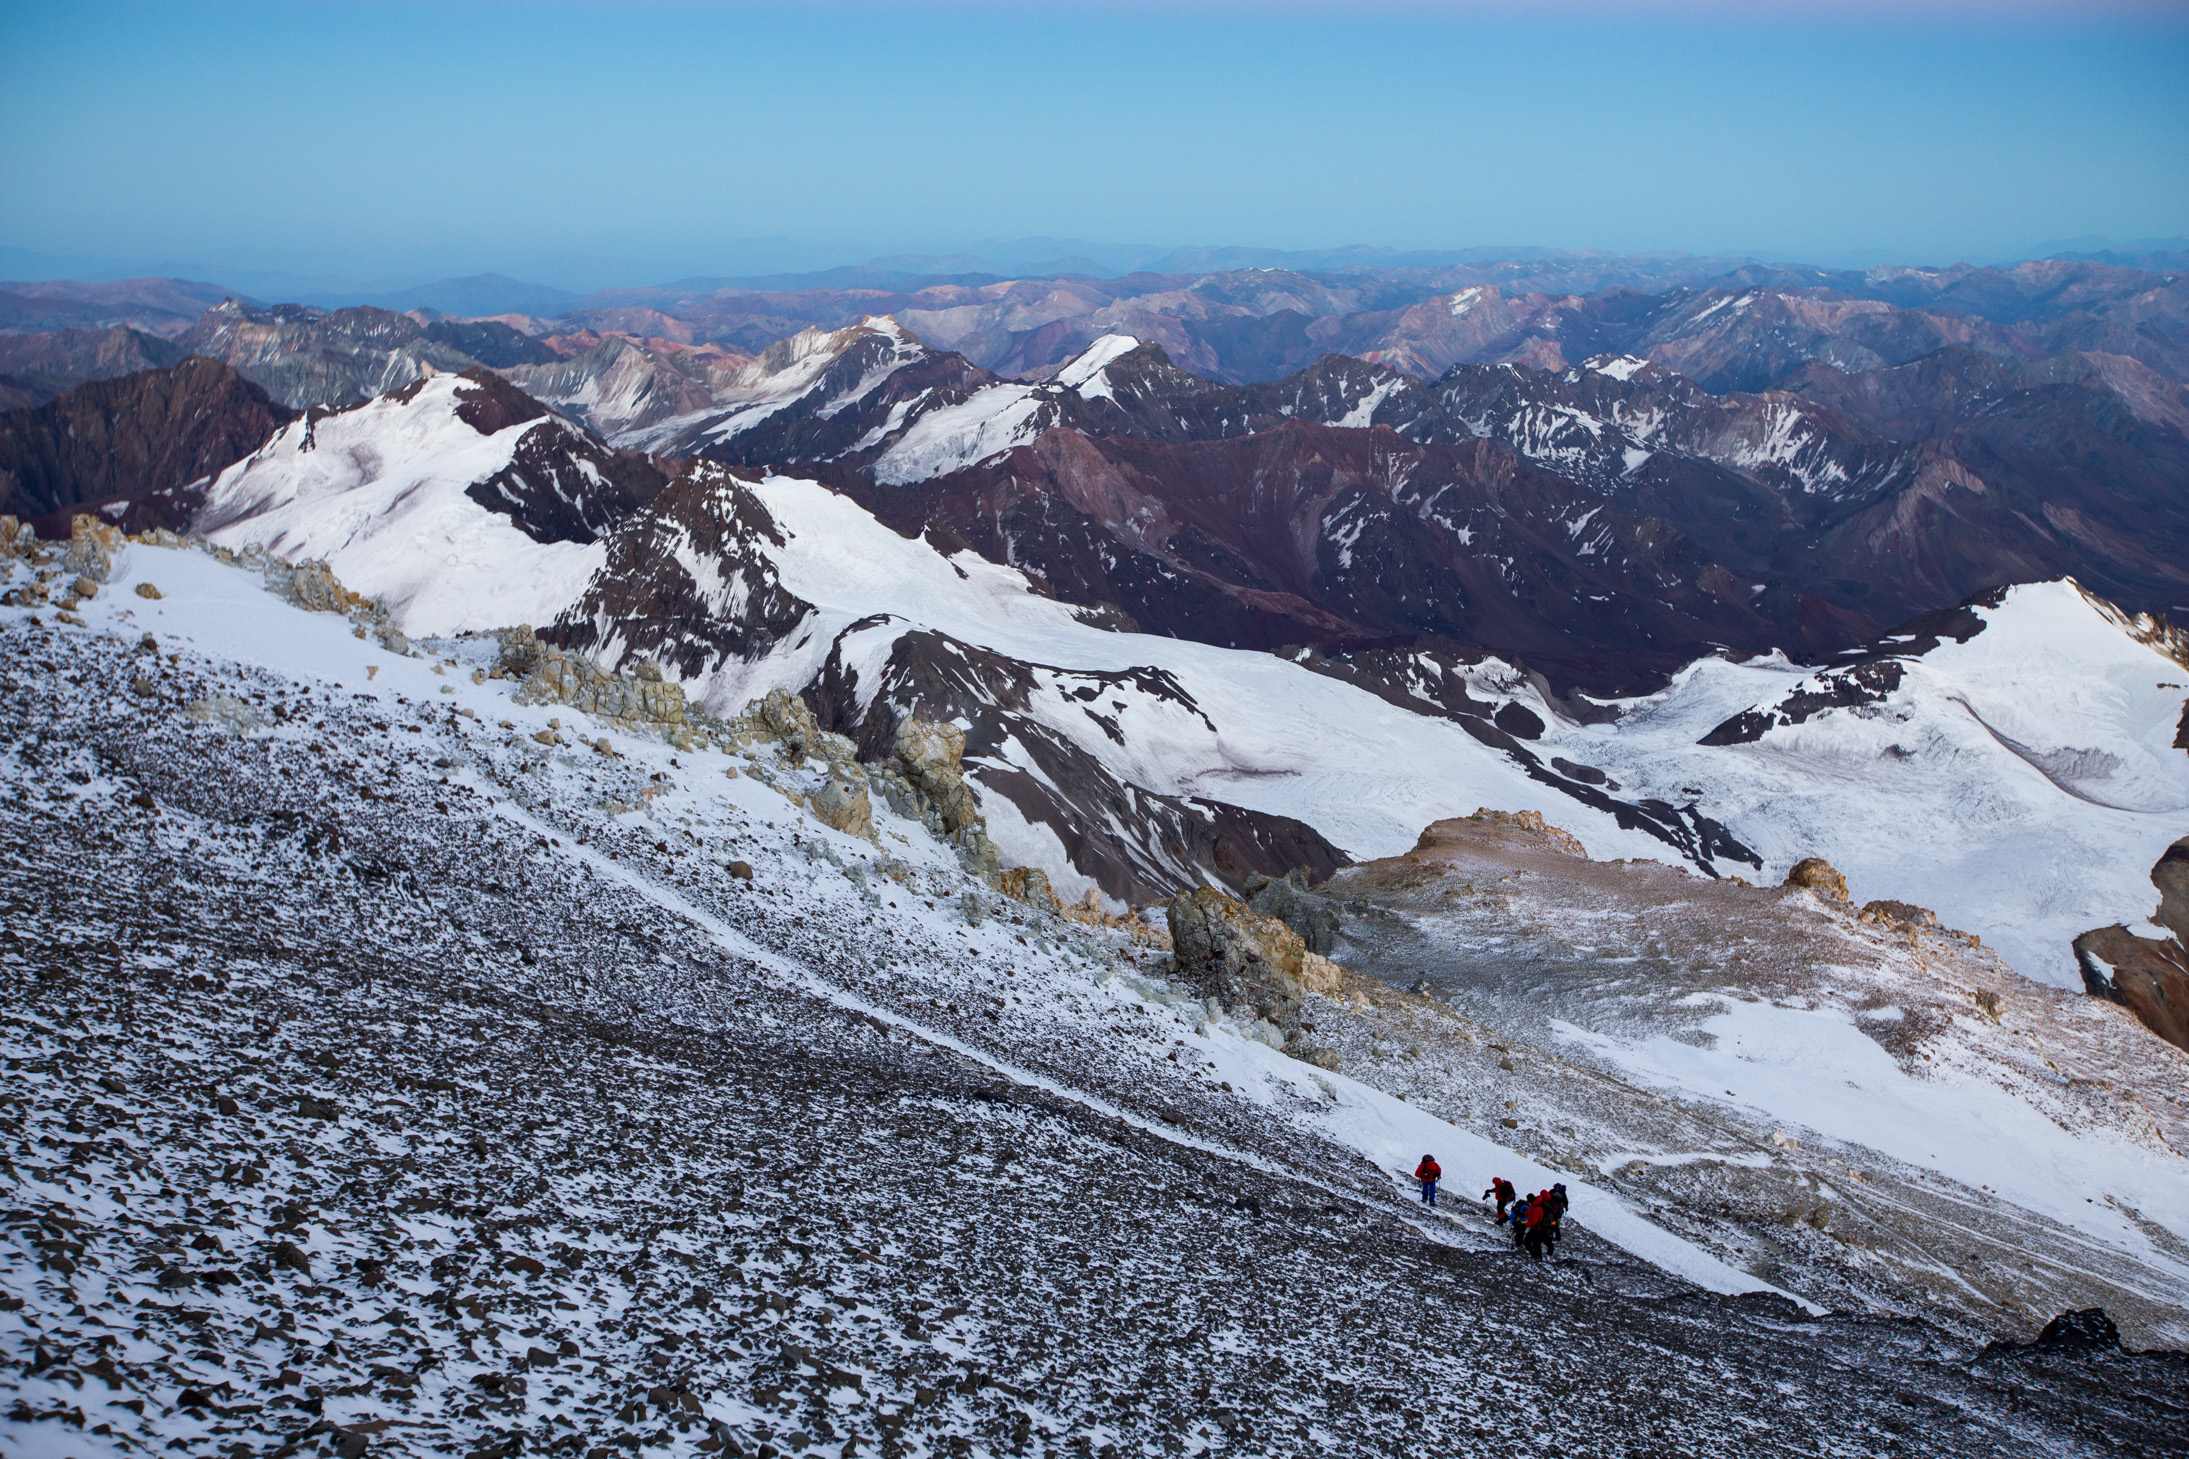
Perhaps my most favorite photo of the trip — the shadow of Aconcagua around 6.30am, close to 6,150m. What a moment! Interestingly, not long after that was also the moment when I almost quit the whole thing. By the time we reached Plaza Independencia (~6,300m) I felt completely drained. I wasn’t sick, no headache, not cold or anything like that. Just started walking quite slowly and had very little energy. I stopped at the old hut at Independencia thinking for some reason we must be around 6,500m (my altitude watch was tucked in under a few layers of clothes) and I was almost crushed when the guide coming up behind us told me we were in fact around 6,300m and there were still another 6 hours to the summit. We had already been walking for almost 6 hours! Oh man, such a tough moment. But luckily I remembered a similar situation on Elbrus so I just sat down in the sun, rested for 20-30 minutes, drank some hot water & ate some chocolate, and decided to take it a step at a time. It took a lot of self-persuasion, but it worked…

For the next 2-3 hours I didn’t take any photos. I had somehow found my groove again and I did not want to stop and lose it. This photo was taken at what’s known as La Cueva (the Cave, altitude of 6,650m), at the end of the traverse I showed you earlier. The weather was great, almost no wind with decent temperatures, and I felt in good shape. This is where you rest for an hour (some even take short naps), eat and drink, and prepare for the final push. Most leave their backpacks and just carry water and cameras for the summit, which I did as well.
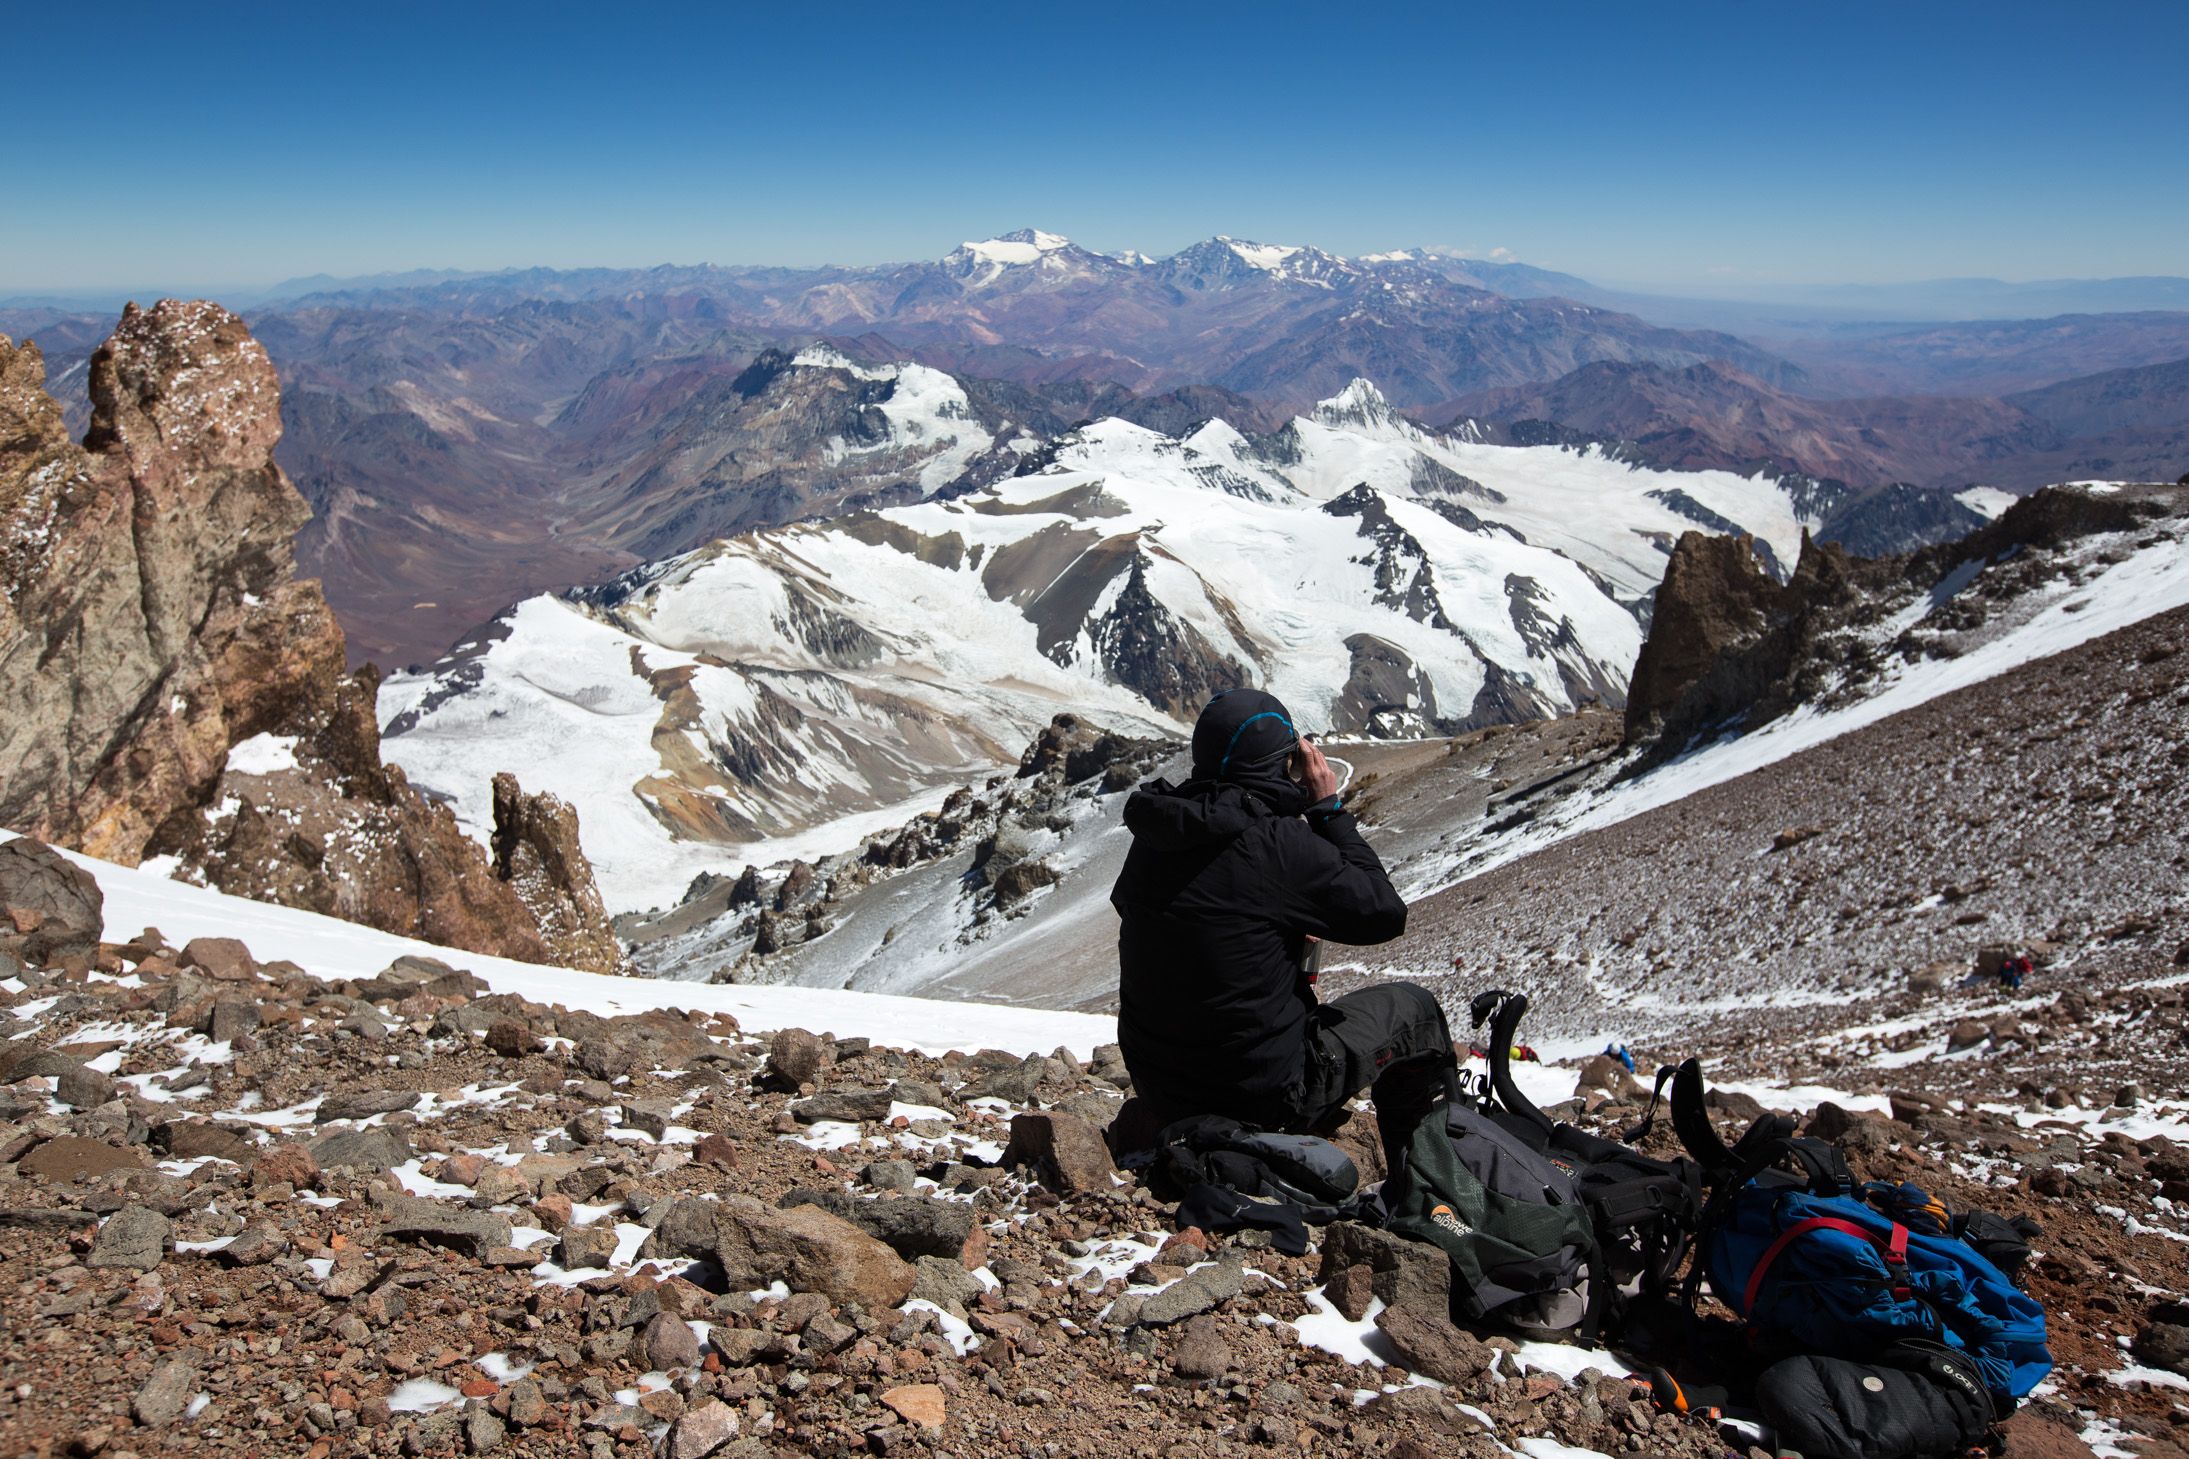
The infamous traverse as seen from La Cueva.

A rest at ~6,800m, this is the guided group we kept trekking alongside with all day. By this point, you start walking really slowly. Most steps require a significant effort and you stop often to breathe and normalize your pulse.

At 6,850m we’re literally 100 vertical meters away from Aconcagua (on the upper left). You may find it hard to believe but this remaining distance — that at lower altitudes you can sprint to within 10min probably — took us a solid hour, if not more! Not going to lie, it was quite a struggle for me by this point. Once again I felt completely drained with almost zero energy and was barely able to make a couple of steps before stopping, at times feeling I was going to just pass out.
No idea if I wasn’t acclimatized enough (this is day 8 for me, most people come here on day 11-12 of their trek) or whether my fitness level just wasn’t what it needs to be, but these were the toughest 100m of climbing ever, by far. It also might have been the temperatures — I was ready for much worse conditions and often felt quite hot as my down jacket is super puffy. Yet I couldn’t just take it off as my pack was a few hundred meters down and plus I wasn’t sure if the conditions would be different at what’s normally a windy summit. Still not aware of how I convinced myself to not turn back and take it slowly, 2-3 steps in one go. Too close to the target perhaps and time was on my side.

Yet once you reach the top, a huge sense of relief comes over you. You suddenly feel lighter somehow and quickly regain your breathing and strength. I was at the top almost exactly 12 hours after starting from Nido, at 3pm with a ~1,500m vertical gain. Despite the fact that I’m smiling, I actually (and strangely) felt and showed little emotion at the top. Perhaps I had used it all up on the trek to here, there were a lot of ups and downs along the way. But it’s a really great feeling, realizing you’re at the pinnacle of an intense 6-month effort 🙂
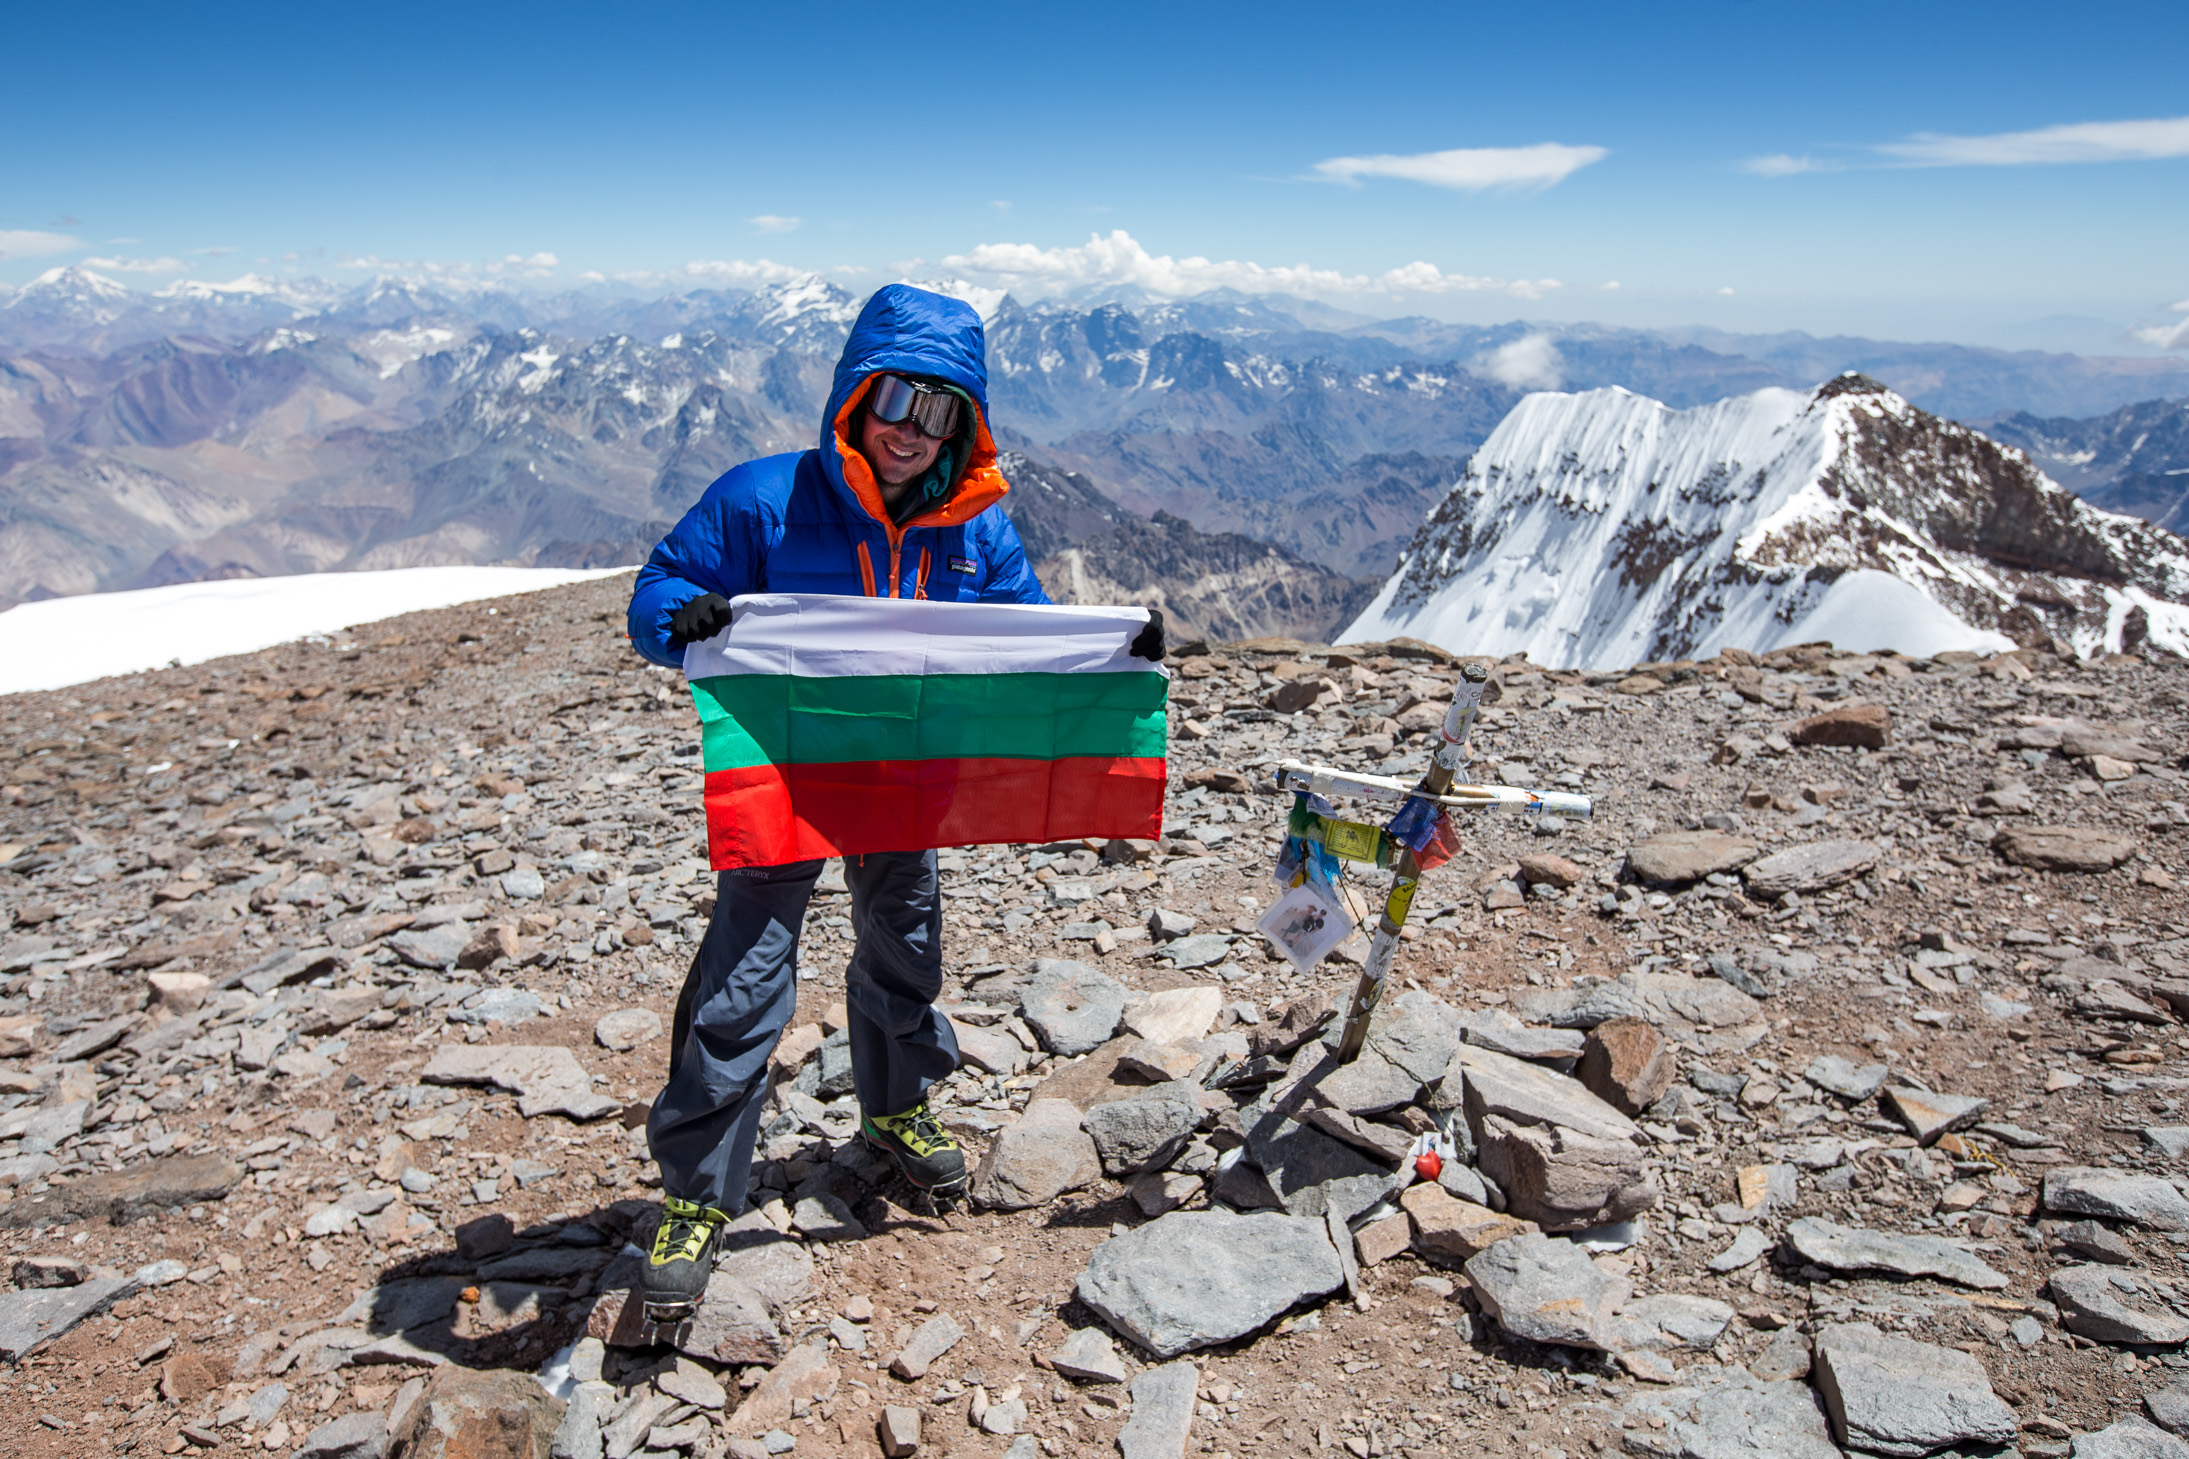
I took a bit of time to admire the amazing vistas. We were extremely lucky with the weather, look at those views!

Oxygen overload 🙂

Not much to share for the way down — 4 hours to camp 2 and then straight to sleep. The next day (Christmas, actually) I packed all my gear and headed to Base camp where you normally stay one final night. But I was desperate for a normal bed and a shower so I got my bags on a mule headed for Horcones and I just walked the 25km back to the Aconcagua park exit. It was a long day (had a 4 hour ride to Mendoza that I hitchhiked for as well) but boy was I happy to be back 🙂
Hope this was interesting, albeit a little long.
Stay tuned for more!

This is amazing! What a glorious day you had to climb! Congrats!
Indeed! Super lucky.
I always used to wonder why anyone would go through the trouble (and risk) of climbing a mountain. You’ve answered all of my questions with this post! Congratulations on a fantastic climb — and thank you for sharing your story and gorgeous images.
The funny thing is that I was wondering the exact same thing on a few occasions throughout this climb 😀
I’m relieved (and not surprised) to hear that! Sometimes the most rewarding things in life are also the ones that most prompt us to ask, “Why on earth am I doing this?” 🙂
Marvelous photos, and a grea achievement! Well done!
Many thanks, Alan! Hope all is well in Turkey! Still there?
Wow! I am endlessly impressed by your intensive hiking trips and photos!
Look who’s talking. Love the life bucket list goals, keep it up!
(I’d love to see a tornado, too.)
Hi Jenn, re: your post of Jan 10, 2018. I clicked your name/link to view your “life bucket list goals” mentioned by “inasearchbalance” of Jan 11, 2018. However, I’m being redirected to a porn site called “goalsandgarbage.com”. Sorry to have to tell you about this, but I thought you would want to know.
That was her website’s name, I guess she doesn’t support it anymore? Appreciate the thoughtfulness, Max. Happy 2020!
Excellent! 🙂
Truly inspiring! I wouldn’t expect any less from you, of course 😉 Stunning place and incredible achievement
Starace! You’re too kind my friend. Hope life is treating you well!
Fantastic, did you need to pay park fee’s etc? One day I might have a go myself, it’s cool to read an article of going alone rather than hiring guides, a much greater achievement!
Thanks! Yes, I did pay park fees. I believe it was close to $800 (high season). If you ever decide to go for it, let me know and I’d be happy to support any way that I can.
Thanks, really appreciated! That’s a pretty expensive fee, hopefully it goes towards the park and locals rather than the pockets of politicians!
Hopefully, but hard to say 🙂 It’s a high fee compared to smaller peaks, but the 8,000m ones are crazy expensive. Everest is something like $11,000 I believe…
Yeah, I have done some research into 8000 peaks, all are expensive. I believe Nanga Parbat is one of the cheaper as they had a terrorist attack at base camp a few years ago, and so the larger companies don’t climb there at the moment. I think you can get a base camp package including fees etc from local companies for around £4000.
Better than expected. Too bad it’s a f***ing tough mountain so no chance of me attempting it 😀
Hello and thank you for your detailed trip report. How did you charge your electronics? Did you carry a radio in case of emergency?
Hi Carlo, thanks for stopping by! I had two power banks with me though I ended up only using one and I didn’t even need all of it. For Denali I had a solar charger which is great, but a lot more expensive than a power bank.
As for radio — on Aconcagua I did not bring one. Weight coupled with the fact I knew the route well and that there would be people around. In hindsight, not the smartest decision perhaps, though I didn’t need it. My climbing partner and I had did have one for Denali
I was wondering how many fuel canisters you ended up using during your trip? Where you preparing your food at plaza de mulas? I have been there many years ago, but weather was horrible, early in season, no one had summited yet when I left.
Ah, you’re asking me to dig up some old memories 😀 If I recall correctly, I bought 4 small ones and ended up using 2-2.5 of them. Definitely left at least one to the guards up at Nido on the way out. But I was there shorter than normal and didn’t sleep at the highest camp where you burn more fuel.
At Plaza de Mulas I prepared my own food, yes. Had plenty anyway and I was on a budget, the cost for 1-2 meals from them is not insignificant over several days.
You thinking of going back or just curious?
Great story! A very nice photo-reportage! All those feelings of the lack of oxygen, frozen air, thinking you are about to turn around. Asking yourself why the hell I’m I here? You made me feeling the same feelings I had reaching Sajama summit a decade ago! Thank you for that. My question would be how did you manage your water supplies?
How did I not reply to this?? Very sorry!
Thank you for the kind words. You know, I do these posts as much for myself as well as we tend to forget the bad times — I’m sure you’ve felt this way, given your Sajama summit (and I imagine others as well) 🙂
Onto your question — at Base camp they had these huge barrels where they melted water and you could pour yourself which was super nice. At the high camps you melt. Super arduous process, sometimes it takes you an hour (at 5,000m and above) just to get to 1-2L of water. And mind you need probably 4-5L a day. So a big part of your routine is finding good snow (gotta be careful to avoid place that have been peed on haha) to melt. You get used to it I guess
Hope you are well and thanks for stopping by.
I will be going to Aconcagua this January. Your story os inspiring and nerve wrecking too. Lol. I am going with a guide given my limited experience in something like that. Just wanted to let you know I ran into your article and you have inspired me and I’ve shared ot with friends who want to go after me.
Thanks for the kind words, Laura! I’m glad the post helped you in some small ways to find the drive to go for it 🙂 Good luck and please do drop by when it’s all said and done to share what’s hopefully good news (and pictures!) of a successful summit 🙂 Hope the weather is on your side as it was on mine.
Laura, did you end up climbing Aconcagua? Hope so! 🙂
Great write up.
my question is how you arranged the camping, did you have to carry all your camping gear?
I’m also consider solo, however comping gear would add great weight to the pack that would already heavy including the winter gear.
Thanks
Hi Kevin, sorry — just saw this.
For a climb like Aconcagua, you need quite a bit of stuff, essentially one large duffel bag (mine was 120/130L I believe) and then one 80-90L backpack. I paid a company to carry my duffel on a mule to the basecamp and only left the 15kg pack with me for the 2 days it took me to get to basecamp. From then on up, I did all my carrying.
You do it in smaller chunks though — one day you carry some of your gear up and make a cache and then come back down to sleep at the lower altitude; then on the next trip up you take some more and maybe if you’re ready, sleep higher up; and the process repeats. It varies with how much you have to climb, what the weather conditions are, how acclimatized you are and so forth, but it’s a good rule of thumb. From I recall, on the I took my tent, super heavy puffy jacket, warmed gloves & socks, food and fuel etc — I left that at my chosen camp site and then returned to base camp. There are usually always climbers around you can chat with and learn from their approaches and strategies, that’s what I do.
But yes, it is heavy stuff — climbing those bigger mountains involves quite a bit of lugging around, no question about it 🙂 Then again, you do need that gear to be ready so no way around it unless you pay a porter, but that takes some of the fun/challenge out of it in my mind.
Should you need anything else, do drop me a line. And good luck! Send photos from your trip, I’d love to see the place again 🙂
hey man awesome read!! I’m thinking of doing it in 2025 I’ve done up to 5630m which was pretty chill by these standards would you suggest doing kilimanjaro first to prepare for this mountain? Also what was your training like? And did u solo kilimanjaro? So many questions hahahaha.
Hi Brady, thanks for your patience here. Great to hear you’re thinking of tackling Aconcagua! To answer your questions:
– Technically you don’t need to climb Kili before going up Aconcagua since you’ve been at 5,630m — but it wouldn’t hurt to get the extra experience 🙂 So it’s up to you. If you can afford it (time and money wise), it would certainly improve your odds as you’d know yourself better and how you respond to high altitudes. I’d done a few climbs before attempting the solo on Aconcagua. If not, make sure you are super fit to compensate.
– Which brings me to training. There’s a section on this in my Denali post >> https://inasearchofbalance.com/2019/06/16/denali/ and you can can also see the “Putting it all together” tab on here >> https://www.alpineascents.com/climbs/aconcagua/training/. At the end of the day, you should put together something that works for you. Aconcagua wasn’t as intense of a preparation as was Denali for me, but I’d still recommend 4-5 days a week of 1 or even 2x sessions per day, combination of cardio, strength, volume and endurance.
As an example, in the mornings on Mon & Fri I would do a HIIT session, Tue & Thur would be a run (sometimes long, sometimes high speed & shorter) and Wed would be a short, but intense climb (700-800m up altitude) with a 10kg pack for 45-50min; in the evenings I’d do tire-pulling runs (on a slight incline for that extra kick) or more strength & stretching; Saturdays would be for a long mountain climb/hike of at least 4-5 hours; Sundays I’d catch up on sleep :))
If you have any other questions, don’t hesitate to ask. I’ll try be to be quicker at responding haha. Good luck! And come back to share photos 🙂
Hey, looking at getting a group of guys together to summit in February 2025. Was curious what your food strategy was. How much did you pack per day snacks/meals? Are you able to buy all food in Mendoza or did you bring it all from home? Are you able to purchase meals at basecamp? What would you suggest?
Hi Ethan. Only now seeing this, for some reason it was marked as spam.
I generally rely on freeze dried food — ready-made packages that you just just pour boiling water into and eat in 10min. They are not cheap, but then again nothing is when it comes to big mountains 🙂 I normally take 1 pack per meal or 3 a day. I’d suggest going for a variety of flavors as you tend to get sick of the same food within a few days — so I’ll take 3 kinds of breakfast packets and at least 4-5 kinds of main meals (mostly with meats like beef, chicken or pork; all usually include rice / potatoes or some other carbs). Freeze dried soups are also a must as they hydrate you well and are easy to eat + offer a nice variety with extra calories.
I also take a lot of high-energy snacks for in between meals and to keep me fuelled — high quality nuts (cashes, hazelnuts, walnuts, etc.), different types of protein bars (natural stuff, nothing with shitty ingredients), almond / hazelnut butter & honey home made mixes, etc. Try to bring some salty stuff as well as you get tired of all the sweets — even plain old crackers would do. For Denali I even brought 1kg lump of feta cheese and another 0.5kg of other cheeses, one of the best decision I made haha 😀
Keep it mind the higher you go / the longer you stay at altitude, the less you’d want to eat, but the more energy you’ll need — so you HAVE to bring things you really, really crave at sea level as that will help you push yourself to eat when high up. A lot of times I have leftover freeze dried packets which ends up being weight I just carry around (ie, need fewer than 3 packs per days on average) — but then again you don’t want to be in a situation in which you don’t have food so you’re better off being on the safe side in my mind 🙂
Lastly — yes, you can buy a lot of stuff at Mendoza. I brought most of my food from home (cheaper and safer), but ended up getting things like fuel, salty crackers, fresh fruit for the first couple of days, etc. As for food at basecamp — you can buy it from the companies there, yes. But it was something like $20-30 a meal (I imagine it’s more now) and I never took advantage of that, too expensive for me 🙂 Or I might have used it once as a change of pace from the freeze dried stuff and no hassle of having to melt & boil water.
Hope this helps. Let me know if you need anything else. And good luck! Come back and share the victory photos from the top 🙂
Hey man, I just stumbled back on this article after it being a bookmark for years. I wanted to thank you for being an inspiration for me!
I climbed Aconcagua last year in Feb and I cannot tell you how many times I read your article in the process, gaining insight and inspiration, observing the photos to create an image of what it must’ve been like for you. Many many days when I doubted myself, I read over your words and took hope and paid heed. I hope it keeps inspiring many people in whose path this article comes!
Hope to use your Denali experience as an inspiration one day! You rock!
Hey man, I stumbled upon this article which was a bookmark in my browser for years! I wanted to thank you for being an inspiration in my success last year on Aconcagua in Feb.
Reading your words many many times in moments of doubt, taking hope from them and using your photos to imagine (in my mind) what it must’ve been like for you to overcome the challenges, it was very helpful and inspiring.
Hope to use your Denali experience for inspiration some day! You rock!
You know, it’s comments like this one that make all the effort of lugging around that awfully big camera and taking the time to put together a detailed post worth it 🙂 Thank you!
I’d love to see some photos from your mountain experience at Aconcagua, even if it’s just at the summit. Do share!
And I sincerely hope you get to go to Denali, it’s a beautiful place.